#NailArtAffiliateManimanicurenail artnailsNailStuff.caOPIPicture PolishPR SamplesSally HansenWhats Up Nails
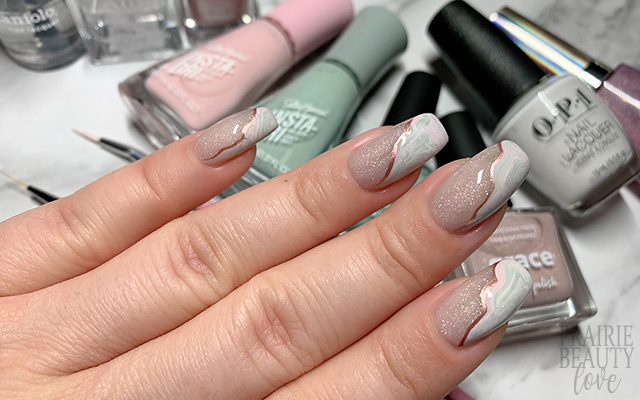
NAIL ART: Soft Pink & Green Dry Marble Geode Nails
Today's mani is another one of those examples of times when I sit down to do my nails with one idea in my head, but the mani I end up with is completely different in the end. This is another mani based on the prompts for the Whats Up Nails March Nail Art Challenge and this prompt was Fluid Art (Spots & Geode). It actually hadn't occurred to me to do a dry marble until I saw the inspiration pictures featuring some STUNNING nails from Sveta Sanders and that's what really, really sparked my inspiration for this mani.
Keep reading for more!
I sort of knew that I wasn't going to end up covering the entire nail with the dry marble, so I wanted to start with a sheer, shimmery base that would be see-through but offer some camouflage since I have a bit of damage to one of my nail beds. I went with this Picture Polish's Grace, a soft neutral pink shade with holo flakes in it. I don't actually think this polish is intended to be worn sheer, but... I applied it carefully and it did exactly what I was hoping.
To create the dry marble, I wanted to keep it really soft and without too much contrast, which keeps the overall look really soft and subtle. I chose two different soft pink shades and two soft green shades, each in both a créme finish and a holo finish, as well as a white créme that I hoped would help to marry the pink and green a little bit more smoothly.
To create the dry marble, I just did a sort of bullseye of blobs that separated the colors - for example: pink créme, green holo, white créme, pink holo, green créme. I did it this way because I didn't want the colours to blend too much and get lost. I used a dotting tool to swirl them around and then picked the polish up using a thicker pointed nail art brush. At this point I just sort of wobbled it across the nail to get the sort of free form shape I was looking for and then filled in to the edge of the nail as needed. I found that as I let the transferred polish dry down, it did get more dimensional and brought on more of the geode look I was going for.
Once the design was dry, I decided that I wanted to add some definition, so using a really fine nail art brush and some rose gold stamping polish, I outlined the marbled design on each nail with a really fine line of polish. Once I was happy with the design, I sealed it in using a water based top coat and then finished with a generous layer of quick dry glossy top coat and voila!
All Products Used
Picture Polish - Grace
Picture Polish - Sage
Sally Hansen Insta-Dri - Racing Rose
Sally Hansen Insta-Dri - Thyme Is Money
Revlon - Galactic Pink
OPI - Alpine Snow
Whats Up Nails - Roses Are Gold
Maniology Smudge Free Top Coat
Quo Flash Dry Top Coat
NailStuff.ca Dotting Tool**
NailStuff.ca 11mm Nail Art Brush**
Random Angled Nail Art Brush
**Product gifted from NailStuff.ca - new customers can use affiliate code TRYSH for 10% off your order!
Highly, highly recommend their nail art tools!
I have to admit that I don't think subtle is necessarily my strong suit generally and initially I wondered if this was too soft (I tend to really, really focus on the impact of contrast in nail art) but I really actually like the delicate feel of this mani. It's almost like a little bit of a palette cleanser... but still nail art, you know?
If you want to actually SEE how I did this mani, head over to @pblnails on Instagram for the video tutorial!
Thanks for reading!


0 comments