
#CBBxManiMonday#NailArtAffiliateBluebird Lacquernail artnailsNailStuff.caPicture PolishPR SamplesWhats Up Nails
NAIL ART: Purple & Green Spring Floral Nails

For the last Green themed #CBBxManiMonday for this month, I feel like I'm cheating a wee bit since I would personally categorize this more as a purple mani... but I am so ready for spring and I was so excited to try out the new stamping plate that was kindly sent to me from Whats Up Nails that I just couldn't help myself. Also, I personally think that green and purple is one of the best colour pairings ever, so it just felt right.
Keep reading for more!
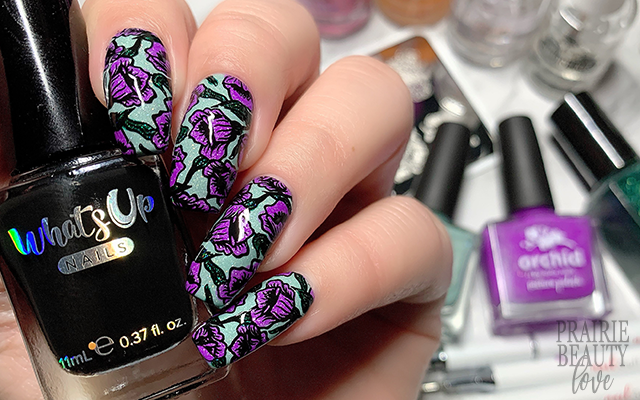
I immediately knew exactly the color story that I wanted to tell with this image, so choosing the polishes for this mani was definitely really, really easy. I knew I wanted a really beautiful purple for the flowers and a soft turquoise for the background, so I grabbed for two absolutely gorgeous polishes from Picture Polish in Sage and Orchid. For the leaves, I knew I wanted a really rich green shade with some beautiful dimension to it to go with those base polishes, so I grabbed for Bluebird Lacquer's The Ryan King, a PPU fan favorite, and I think the combination of these polishes worked beautifully.
For my base, I applied one coat of Sage to all of my nails - it's sheer but I didn't need opacity for the way that I was going to do my reverse stamping, so it worked out just fine.

For the reverse stamping, I picked up the image using my favorite black stamping polish and then used a combination of a fine dotting tool and a nail art brush to fill in the image. I started by filling in the leaves in the darker green, then the flowers in the purple, and finally I filled in the gaps left in the background using the soft turquoise. I don't usually fill in the whole image because I find that it can make placement a little bit tricky, but because the flowers in this image are so large I just wanted to ensure that I got a nice, smooth application of the decal with no lumps from the fill.
I let the images dry down on my stamper head for about a half hour until they were dry to the touch but still left a slight fingerprint when touched, and then I applied latex barrier to help with clean up. Next, I applied a thin layer of sticky base coat to the nail (I did this step one nail at a time) and let it dry down until it was tacky before transferring the image. For some added visual interest, I did alternate the direction of my placement because I feel like it just gives a better overall look to the mani.
Once I cleaned up my edges with a cuticle tool followed by a clean up brush dipped in acetone, I sealed in the design first with a nail art top coat and then went in with a generous layer of quick dry glossy top coat for shine and volume. And voila!

All Products Used
Picture Polish - Sage
Picture Polish - Orchid
Bluebird Lacquer - The Ryan King 2.0
Whats Up Nails - Neither Noir
Orly Bonder Base Coat
Apipila Smudge Free Top Coat
Cuticula Limitless Quick Dry Top Coat
Whats Up Nails B074 A Flower A Day Stamping Plate*
Whats Up Nails Magnified Clear Stamper
Pueen Latex Tape Liquid Peel Off Cuticle Guard
NailStuff.ca Dotting Tool**
NailStuff.ca 11mm Nail Art Brush**
NailStuff.ca Angle Silicone Tool**
* = PR Sample
** = PR Sample/Affiliate from NailStuff.ca - affiliate code TRYSH

I have to say... I am so completely obsessed with how this mani turned out and I really think this is one of the most beautiful floral stamping images in my collection, so it will definitely probably get some more attention. This new spring plate from Whats Up Nails is definitely a bit of a must have, in my opinion, and I would definitely recommend checking it out. And, of course, be sure to keep an eye out in the next couple of weeks for some more spring and Easter themed nails using this plate as well as some other designs using the new plate releases from the brand.
Don't forget to head over to Cosmetic Proof and See The World In PINK today for more Green themed nails for this week's #CBBxManiMonday! And also, if you're not following me over on Instagram @pblnails, be sure to head over there and follow to keep up on all of my nail art along with video tutorials for all of the designs I post here on the blog!
Thanks for reading!


0 comments