
#NailArtAffiliateColor ClubEaster Nail ArtKADSnail artnailsNailStuff.caPR SamplesSaki CosmeticsWhats Up Nails
NAIL ART: Purple Pastel Reverse Stamped Easter Nails

I will fully admit that I'm diving headfirst into the Easter theme at the moment. What can I say, I just absolutely love a theme. Also, as soon as I saw the Whats Up Nails B074 A Flower A Day Stamping Plate*, I knew that I was going to do some version of today's mani - though I will admit that the details and specifics were a little bit hazy in my mind until I actually sat down to do them. Sometimes the vision is super clear and other times you just sort of have to wing it, but I really do think you can end up with amazing results either way.
Keep reading for more!

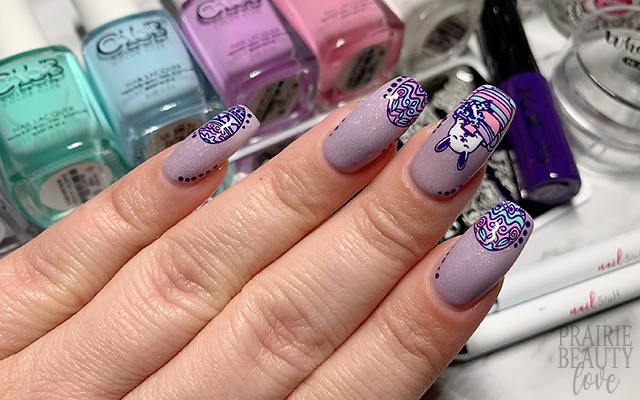
When it came to choosing the color story for this mani, I knew I wanted it to live in a really cool toned pastel place and I knew that ultimately I would, as usual, be reaching for my Color Club cremes to fill in the design. I ended up choosing pink, purple, blue and turquoise for most of the fill along with a white for the bunny. It was only after I chose the fill colors that I was able to choose a base polish and I ended up going with this really gorgeous pale lavender from Saki Cosmetics called Dressed Up that I got in an indie collab last year. It really is a stunning crelly with a really fine holo shimmer through it as well as these really delicate iridescent flakes - perfect for the vibe I was going for with this mani.
I applied two coats of Dressed Up to all of my nails as my base.
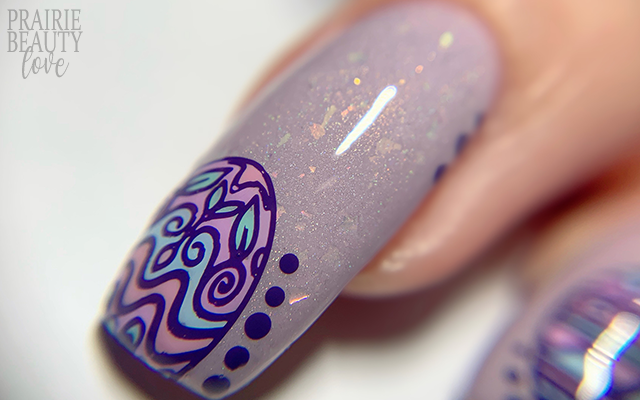
I really, really didn't want to do a black pickup for this mani because I felt like it would weigh it down and mess with the vibe, but I still wanted a deeper shade for some strong contrast so I decided to go with a dark purple for the stamping pickup. Ultimately I decided to use two of the easter egg images from the plate because I felt like the design in those two eggs worked best for the 4 color fill I was going with. And, of course, I decided to put the bunny on my middle finger because it's the largest finger on my hand and I felt like it would carry the size of that image best.
To fill the images, I used the teeny tiny NailStuff.ca 4mm Nail Art Brush** because it really allowed me to get in those tight spaces in the images without going outside the lines. Sometimes I go for a longer 7mm or 11mm brush for reverse stamping, but I think the 4mm was definitely perfect for this design. I filled in the images, being mindful to try and get a balanced amount of each color into the design and then let the dry on the stamper head.

When reverse stamping, I feel like you really have two options as far as transfer are concerned. You can either use a sticky base coat or a foil glue to grab onto the image or you can apply it onto your base polish while it's still not quite dry and has a tacky surface. Generally, I do the former and use a sticky base coat, but this time around I ended up doing the latter and it actually worked quite well - with just one little wobble on my ring finger that I was luckily able to smooth out. If you're going to do this method, be careful because if your base isn't dry enough you can disturb and dent it and if it's too dry you might not get a solid transfer. Once I had transferred the images to the nails, I decided I needed a little bit more visual interest to the overall design, so I went in with a dotting tool and some of my dark purple stamping polish and just added some randomly placed dots onto the nail and I think it really finished off the design nicely.
Once I was happy with the overall design, I sealed it in with a nail art top coat before finishing with a generous layer of QCTC and voila!
All Products Used
Saki Cosmetics - Dressed Up
Color Club - French Tip
Color Club - I'm Outta Here
Color Club - Factory Girl
Color Club - Can You Not?
Color Club - Totally Worth It
KADS - 007 Purple
Apipila Smudge Free Top Coat
Vibrant Vinyls Fast & Hard Top Coat
Whats Up Nails B074 A Flower A Day Stamping Plate*
Whats Up Nails Magnified Clear Stamper
NailStuff.ca 4mm Nail Art Brush**
NailStuff.ca Dotting Tool**
* = PR Gifted
** = PR Gifted/Affiliate NailStuff.ca - code TRYSH for 10% off first order

Seriously, I just love a theme so much and I'm so thrilled with how this turned out. The easter egg images from the Whats Up Nails B074 Stamping Plate* are just sort of perfect. They have great pick up and they fill in really well and I mean... how cute is the teacup bunny? I'm so happy with this mani!
Keep an eye out on the blog next week for more Easter themed nail art designs be sure to follow me over at @pblnails on Instagram to keep up to date on my nail art and to see video tutorials of all of the designs I post here on the blog!
Thanks for reading!


0 comments