#CBBxManiMonday#NailArtKADSnail artnailsNicole DiaryPainted PolishPolish PickupPR SamplesWhats Up Nails
NAIL ART: Smoky Teal & Rose Gold Abstract Nails
I have to admit that even though we're knee deep in themes right now - later this week I've got plans to post 420 and Earth Day themed nails - I find myself drawn almost exclusively to doing abstract designs using some super fun stamping plates I've gotten my hands on recently. I mean... the possibilities are just endless when you think of the different color combos and designs you can put together in these sort of abstract themes. All of this to say - definitely keep an eye on the blog here in the coming weeks for more abstract nail designs. I will admit that I'm pushing the #CBBxManiMonday Pastels theme for this month with this one, but I really couldn't resist getting this base polish onto my nails ASAP.. and it's a little pastel. Maybe.
Keep reading for more!
The whole color story for this mani definitely came from this base polish, which is yet another Polish Pickup shade from Painted Polish. I was actually a little bit worried that I wasn't going to be able to justify doing PPU anymore when they changed the shipping costs to Canada, but I've gotten into a group buy with another polish obsessive here in Winnipeg so I can satisfy my collab FOMO and keep getting all of the beautiful polishes that Painted Polish releases in PPU monthly.
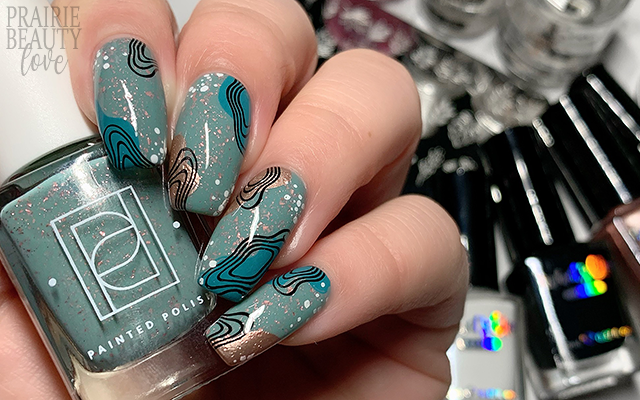
Painted Polish's Just Keep Blooming was featured in March's Polish Pickup and it's described as a greyed out minty teal crelly with pink metallic flakes. Obviously I wanted to lean into this base polish so I decided to pair it with stamping polishes in a slightly richer tone of teal, a classic metallic rose gold and, of course, black and white. I was a little bit unsure of how it was all going to come together, but I'm actually kind of obsessed with this color story.
For my base, I applied two coats of Just Keep Blooming and let them dry down completely before moving on to my stamping.
I actually went into this mani with a much more simple design in mind, but then my kitchen sink brain swooped in and decided to go with a little more detail than initially intended. I started by applying these sort of nebulous shapes to the corners of the nails in teal and rose gold, altering and playing with placement to get a different look on each nail. Next, using black stamping polish I applied this sort of geode looking line drawn image at the same corners as the blobby shapes, again playing with the placement to get a different look to each nail so that your brain doesn't immediately see the same image on all of my nails. Finally, I added a little bit more interest with some white dots at the opposite corners, which I think really just pops the whole design overall.
Once I was happy with my stamping, I sealed everything in with a nail art top coat and then followed with a generous layer of quick dry glossy top coat for shine and volume. And voila!
All Products Used
Painted Polish - Just Keep Blooming
KADS - 039 Blue Green
Whats Up Nails - Roses Are Gold*
Whats Up Nails - Neither Noir
Whats Up Nails - Blanc My Mind*
Apipila Smudge Free Top Coat
Sweet & Sour Lacquer Gloss Sauce Top Coat
Nicole Diary L36 Stamping Plate
Whats Up Nails Magnified Clear Stamper
Pueen Latex Tape Liquid Peel Off Cuticle Guard
* PR Sample
I am so, so in love with how this mani turned out. I was a little but unsure about the colors at first, but in the end I think it made for a really gorgeous look. I also really love how the stamping images came together. There was a bit of an instinct in me to vary things a little more or add some more detail, but I think this ended up very much a goldilocks situation - it's just right, needs no more and no less. Definitely can't wait to play a little bit more with this stamping plate because I feel like the possibilities are endless, like I said above.
Be sure to head over to Cosmetic Proof and See The World In PINK today to check out more Pastel themed nails for this week's #CBBxManiMonday. Also, head over to @pblnails to check out a video tutorial for this mani along with all of my other nail art designs!
Thanks for reading!


0 comments