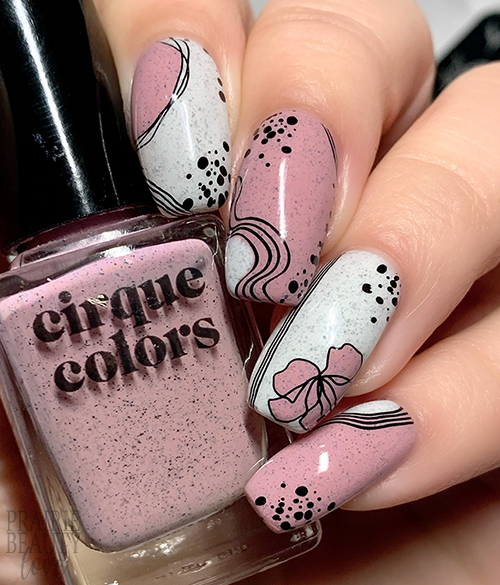
NAIL ART: Two Toned Speckled Abstract Nails
Our march theme for #CBBxManiMonday is Floral and I have to admit that I was a little stumped on what I was going to do since I went so hard earlier in the season with floral nails. In the end, though, I decided to lean into where my mind is sort of stuck at this point - abstract nails - and add in a floral element. It's a bit of a fudge, but... that's what you do when you have free reign with a theme, right? I mean.. right??? Anyway, I grabbed for my current favorite stamping plate and some must have indie polishes and I just... sort of went for it.
Keep reading for more!
What inspired this mani was actually a peruse through my own Instagram while I was looking for an old mani to try to remember how I did it and I caught sight of one that I'd used Cirque Colors' Hatch as the base for. I have a bit of an issue with object permanence, so I love getting reminded of great polishes that are tucked away in my drawers that I have, for all intents and purposes, forgotten I own. I decided to pair Hatch with Shale, which is described as a dusty lavender but that I would personally say is more of a dusty mauve. Both of these polishes are in Cirque's speckled finish, which features crelly bases packed with irregular black specks that gives a really pretty delicate speckled look.
I decided I wanted to alternate the base colors for this mani, so I applied these two shades onto alternating nails in two coats for full opacity and let them dry down completely.
The floral image on my ring finger is what actually really inspired this entire mani and gave me the idea to fill in closed images with the opposite color and have them poking in from the corners. I decided to use the flower, a large circle, and then a few different almost geode vibe sort of images. I used a dotting tool to fill them in and let them dry down on the stamper head until they were ready to transfer. Once they were dry to the touch but soft enough to dent with my fingertip, I applied a thin layer of sticky base coat and let it dry down until it was tacky before transferring the image. Next, I knew I wanted add more interest and cohesion to the nails, so I used two different images to add dimension. The first was a scattered spots image, which I think works for pretty much any mani like this one, and then a really fine, slightly grungey lines image that I don't think was intended to be used this way but works quite perfectly.
Once I was happy with my stamping, I sealed it in with a nail art top coat to prevent smudging and then finished with a layer of quick dry glossy top coat for shine and volume. And voila!
All Products Used
Cirque Colors - Hatch
Cirque Colors - Shale
Whats Up Nails - Neither Noir
Apipila Smudge Free Top Coat
Sweet & Sour Lacquer Gloss Sauce Top Coat
Orly Bonder Base Coat
Nicole Diary L36 Stamping Plate
Whats Up Nails Magnified Clear Stamper
NailStuff.ca Dotting Tool**
** = PR Sample/Affiliate - NailStuff.ca use code TRYSH for 10% off first order.
I'm not even going to downplay it, I'm completely in love with how this turned out and now (of course) my brain just wants to do 900 different versions of this mani. I'm just so beyond thrilled with how the design came out overall - admittedly, it was a bit of a trust the process type of situation and I wasn't confident all the way that it was going to be what I wanted it to be, but in the end it turned out full on Golidlocks.
Be sure to head over to Cosmetic Proof and See The World In PINK to check out their #CBBxManiMonday floral themed nails this week. Also, if you aren't already following me over at @pblnails on Instagram, head over there and check out video tutorials for all of my nail art.
Thanks for reading!


0 comments