
NAIL ART: Fuchsia & Teal Abstract Swirl Gel Nails

Well, I can officially say that I'm down a gel polish rabbit hole at the moment and I'm having a lot of fun playing around with techniques and designs that I never really had a chance to play with because I've always used traditional polish. Now, don't get me wrong, I'm still a huge fan of traditional polish, but there's definitely a brand new spark of creativity that has come with being able to try out different things using gel polish. For today's mani, I'm dipping into some gel liner polishes that I picked up recently and I'm super, super in love with how this one turned out.
Keep reading for more!

So for this mani, I knew that I wanted a sheer white base to work from, but I also wanted to bring in some texture and not just have it be plain. A technique that I often use with regular polish is to sandwich a flakie topper between two coats of a sheer white polish, so I decided to do a version of that with this mani. Instead of a flakie topper, I went in with loose flakes from NailStuff.ca that I don't reach for nearly enough. Victoria from NailStuff was actually kind enough to let me name these particular flakes and I chose Turtle Reef after my favorite animal because the color shift just reminded me of a turtle swimming amongst the coral reefs.
After applying my peel off base coat, which is a must for me since I change my polish so frequently and do three mani's a week here on the blog, I went in with one coat of my milky white polish and cured. Next, using an angled silicone tool, I picked up some of the flakes and pressed them into the tacky layer in the cured polish. Finally, I followed with one more coat of the milky white polish to get that sandwiched look. I love this technique because it maintains a sheerness that I find visually really pleasing, but the addition of the flakes adds a little something and camouflages your natural nail just a bit.

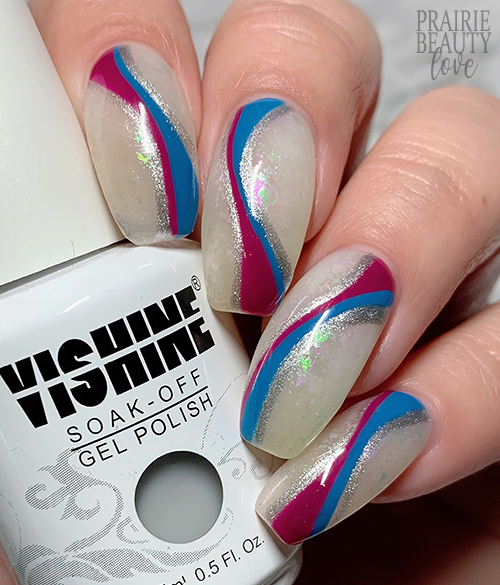
For the actual nail art part of this mani, I kept it really simple. I decided to go with two opaque créme finishes and one metallic that's not quite opaque and brings a really pretty shimmer. I started by applying a line of the fuchsia polish to each nail, keeping it narrow at one end and then wider at the other and cured that for 60 seconds. Then I repeated the process with the blue polish, widening the line at the opposite side from the pink and cured for 60 seconds. Finally, I came in with the silver and applied even lines on either side of the pink and blue lines to just add a little twinkle and then, of course, cured for 60 seconds.
Once I was happy with the design, I went in with my glossy gel top coat on all of my nails and cured that as well. And voila!

All Products Used
Unt Ready For Takeoff Peel Off Base Coat*
Vishine Gel Polish - Jelly Milky White
NailStuff.ca - Turtle Reef Nail Flakes**
Beetles Gel Polish - Festival Fuchsia
Beetles Gel Polish - Methyl Blue
Beetles Gel Polish - Glacier Grey
Aimeili No Wipe Gel Top Coat
NailStuff.ca Silicone Tool**
* = PR Sample // ** = PR Sample/Affiliate NailStuff.ca ~ use code TRYSH for 10% your first order.
I 100% understand now why nail techs prefer to use gel polish because if you work confidently and know what you're doing, you really can put together beautiful nail art really, really quickly because of that ability to cure your designs and not have to worry about dry time. For me, this really is a huge part of why I'm enjoying playing around in the world of gel polish so much at the moment. I'm still not quite confident and I don't quite know what I'm doing, but I'm getting better and I'm definitely finding some renewed creativity.
Thanks for reading!


0 comments