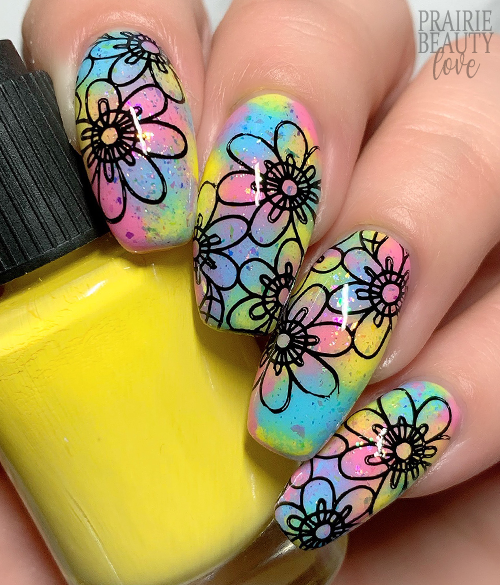
NAIL ART: Pastel Rainbow Flower Power Nails
THIS POST IS IN PARTNERSHIP WITH PUEEN COSMETICS.
Something really interesting to me that's happening right now is that so much from my childhood and adolescence is starting to be back in style to the point that I feel like I've been transported back to junior high. It's really, really strange, but sort of fun. One thing that seems to be having a moment right now is the sort of psychadelic hippie thing that really got big in the 90s and I am very much here for it, so I decided to keep that in mind when I was putting together this mani.
Keep reading for more!
I love, love, love using these three stamping polishes from Pueen to create gradient bases for my nail art because they're so insanely pigmented but they really blend beautifully together. For this mani, I wanted to do this sort of patchy gradient style and it did actually take a bit of trial and error but it came together pretty well, in the end.
I started by applying a nearly white créme polish as a base to all of my nails and I let that dry down completely. Next, I applied fairly large dots of my three stamping polishes just randomly to a makeup sponge. You don't have to be too fussy about this step, but I definitely recommend keeping the dots quite large and being sure that you apply enough polish to get a smooth application. Next, pounce onto the nail, being careful not to move the sponge around too much. I did two layers of this to get the blend and opacity that I was looking for.
The reason I say don't move around too much is because you really only want to blend the edges between each color and you can achieve that by just pouncing. If you move around too much, you end up over blending and the whole thing can end up really muddy and not very attractive.
Once I was happy with the base, I decided to give it a little bit of extra blending by applying an iridescent rainbow flakie topper. This not only adds texture and visual interest, but it also really smooths out any places where the blend might have been a little bit patchy or otherwise not-quite-seamless.
Next, I went in with my stamping. I decided to go with this floral image because I think it really works with that kind of flower child revival theme that I was going for. The image also has finished edges so I was able to apply it towards the corner of each nail to get a unique design on each without having to worry about removing parts of the image or dealing with unfinished images. I used a black stamping polish for this, which I think is what really drives home the 90s of it all.
Once I was happy with my design, I sealed everything in with a nail art top coat and then finished with a layer of glossy top coat for shine. And voila!
Products Used
Pueen Cosmetics - 802 Baby Blue*
Pueen Cosmetics - 804 Bright Yellow*
Pueen Cosmetics - 808 Sweet Pink*
Pueen Cosmetics - 805 Black Jack*
Pueen Cosmetics 110 Stamping Plate
Pueen Cosmetics Chunky Soft Transparent Stamper
Pueen Cosmetics Latex Tape Liquid Peel Off Cuticle Guard*
Starrily - Unicorn
Apipila Smudge Free Top Coat
Vibrant Vinyls Fast & Hard Top Coat
* = PR Sample
Seriously, this design feels like a 90s teenage girls bedroom to me - like the type you'd have seen on a TV show and been absolutely desperate to recreate in your own room. Please tell me that this isn't just me!
If you're interested in any of the Pueen Cosmetics products I used for this design, they're all available from Amazon and I highly, highly recommend them all!
Thanks for reading!


0 comments