
NAIL ART: Color Blocked Squiggly Abstract Nails

One of the cool things about stamping for nail art is that a little bit of creativity in the way that you use different stamping images can go a really, really long way. There are a few artists whose work always blows my mind in the way that they use stamping in ways that hadn't even occurred to me. When I sat down to do today's mani, I went in with the idea that I wanted to keep it fairly simple, perhaps even minimalist, and I wanted to reach for one of the new plates in my collection that I hadn't gotten the chance to use yet. I wasn't until I was sitting there staring at three plates that still had their blue film on them that inspiration struck and I decided to use two really simple stamping images in a way I'd never thought of to create a mani that I think turned out pretty great.
Keep reading for more!
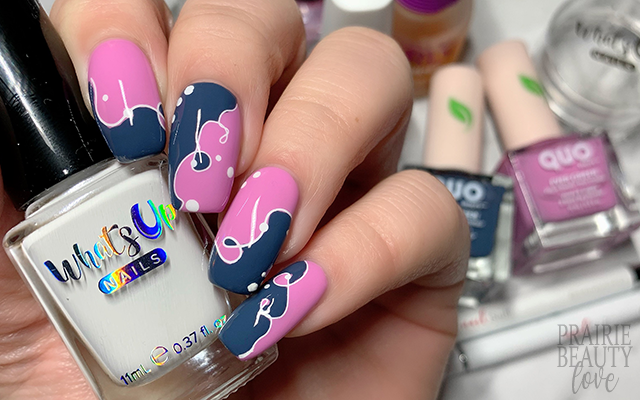
I've actually been wanting to use the two main polishes that I used for this mani for several weeks now, but I hadn't thought of a design that felt right so they'd just been sitting on my desk and taunting me. For readers outside of Canada, Quo Beauty is Shoppers Drug Mart's store brand and features a wide range of different types of beauty products and tools. New to their nail polish range is the Ever Green line, which is made with 70% renewable vegetal ingredients and I was curious about how they would perform so I grabbed these two shades that I thought would look stunning together in a mani. Wisteria is a really beautiful mid-toned orchid pink shade and Larkspur is a deep, smoky blue. I'm actually really, really impressed with the quality of both of these polishes. The formula is really smooth and level with two coat coverage that dries down reasonably quickly. I will definitely be picking up at least a few more polishes from this range.
For this mani, I started by applying two coats of Wisteria to all of my nails and letting them dry down while I worked on my reverse stamping.

Until I sat down to do this mani, using these sort of loopy sqiggly line images for reverse stamping or color blocking never occurred to me but once the idea hit I had to get it on my nails. For this mani I used two different images from the Nicole Diary 272 Stamping Plate with the intention of filling and placing them in such a way that each nail really would look entirely unique. I decided to pick up the images using white stamping polish and then fill them in on the stamper head using first a fine nail art brush and then the brush straight from the polish bottle. I probably gave the designs about 45 minutes to dry down until they were dry to the touch but still slightly showed fingerprint indentations when touched on the stamper. Once they were ready to transfer, I applied cuticle barrier and then a sticky base coat so that I could easily transfer directly onto the nail. Once I had transferred the image, I used a cuticle tool to trim the excess and a brush dipped in acetone to crisp up the edges. I also decided to add a couple of extra dots to my middle two fingers at this point using a dotting tool of similar size to the dots in the stamping image.
To finish, I first applied a layer of nail art top coat to seal in the design and then followed with a generous layer of glossy top coat for shine and volume. And voila!

All Products Used
Quo Ever Green Nail Polish - Wisteria
Quo Ever Green Nail Polish - Larkspur
Whats Up Nails - Blanc My Mind*
Orly Bonder Base Coat
Apipila Smudge Free Top Coat
Cuticula Limitless Quick Dry Top Coat
Nicole Diary 272 Stamping Plate
Whats Up Nails Magnified Clear Stamper
NailStuff.ca Dotting Tool**
NailStuff.ca 11mm Nail Art Brush**
* = PR Gifted
** = PR Gifted from NailStuff.ca - use affiliate code TRYSH for 10% off your first order.

As I've said in recent posts, abstract nail art has me by the throat at the moment and I think that this mani just really underscores how versatile these types of different designs can really be. It never occurred to me to use these sort of fine lined, really minimalist types of images in this way but I really think the final product ended up really cool and impactful even though it's also quite simple and straight forward. Love it!
If you're not already following me over on @pblnails on Instagram, be sure to head over there and follow me for video tutorials of all of the nail designs I post here on the blog!
Thanks for reading!


0 comments