
NAIL ART: Blobby Abstract Spring Floral Nails
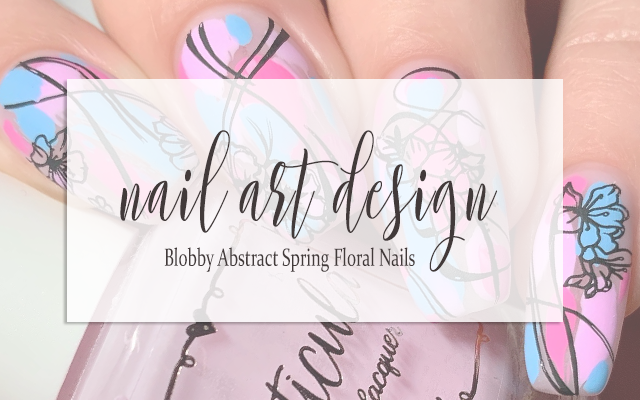
Full disclosure - as I write this post, I'm subsisting on 3 hours of sleep and the laziest determination of life after being kept up most of the night by my dog who is very, very itchy at the moment because of her allergies. Anyway, for this week's Floral themed #CBBxManiMonday, I tried something sort of silly but I think it actually worked sort of beautifully - much more so than I was expecting, if we're being honest. I called this design "Blobby" because that is literally what it is - blobs of polish on a sheer base with some high contrast stamping. And I kind of love it!
Keep reading for more!
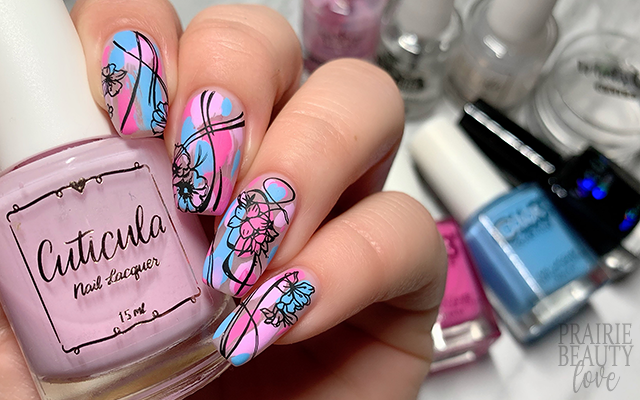
I was very, very much in the mood for cool pastels - though one could argue that 2/3 of the colors I chose for this mani are too saturated to be pastels. Still, that's where they live in my head. I knew I was going to start with the Cuticula Neutralizer Base Coat as my base because it has that cool pinky lean and does a good job of camouflaging without adding coverage, which is what I was looking for with this mani so I applied one even coat and let it dry down.
For the blobby design, I decided to grab for a pink, a lavender, and a soft blue all from Color Club. I knew instinctively that if I wanted this to work, I really, really couldn't be too precious about applying the little blobs or it wouldn't have the right feel, so I just kept it simple. With a mind for balance, I just went in with the brush straight from the bottle and applied varying sizes of blobs of each of the three polishes over the nail, leaving some gaps so that you could see through to my nail. There really isn't much more I can say about this step - I really did just slap on some blobs and go on my way. If you're going to try this technique, I will say... trust the process because in the middle you're going to probably doubt whether or not you can get it to look good.

For the stamping, I knew I had to keep it floral to fit with our May #CBBxManiMonday theme, but I wanted it to feel like it fit with that blobby base. I ended up digging around in my stamping plates for a while before I settled on the Pict You PY-J053 Stamping Plate, which has a combination of very fluid feeling graphic images as well as sort of tropical feeling flowers. It felt like the right fit and I ended up using a combination of the swoopy graphic images as well as the floral images to build designs that would fit and fill each nail.
Once I was happy with my stamping, I sealed it in with a nail art top coat and then followed with matte top coat to take down the shine and really pull everything together. And voila!

All Products Used
Cuticula - Neutralizer Base Coat
Color Club - Diggin' The Dancing Queen
Color Club - Salt Water Taffy
Color Club - Take A Chill Pill
Whats Up Nails - Neither Noir
Apipila Smudge Free Top Coat
Cuticula Cloud Cover Matte Top Coat
Pict You PY-J053 Stamping Plate
Whats Up Nails Magnified Clear Stamper
Pueen Latex Tape Liquid Peel Off Cuticle Guard
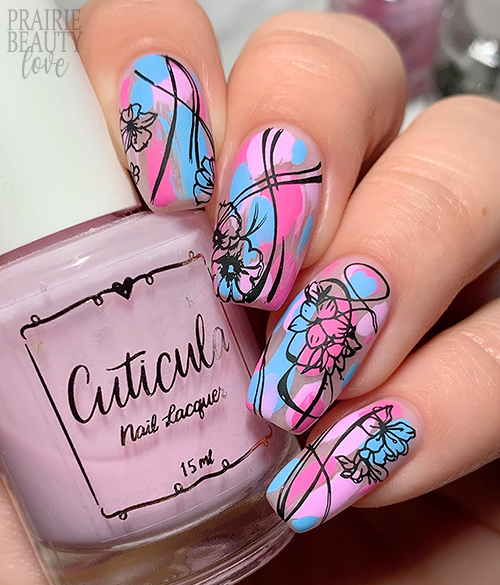
It's funny because even as I look at these pictures and really, really like the result, it does still almost feel like this shouldn't have worked - but it did! I think the trick to making it look cohesive and not just like you blobbed some polish onto your nails is that stamping design on top. It needs to provide good coverage and a good amount of contrast to really keep your eye focused on the overall look. And now, of course, I will definitely have to be trying this technique with more different design ideas so keep an eye out!
Be sure to head over to Cosmetic Proof and See The World In PINK for more floral themed nails and also head over to @pblnails for a video tutorial on how I did this mani. Follow me there to keep up on all of my nail art.
Thanks for reading!


0 comments