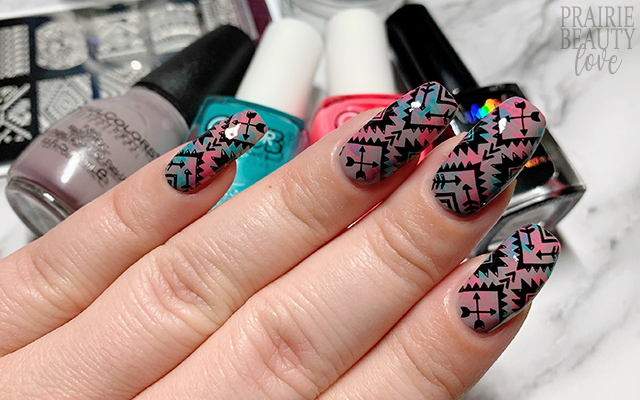
NAIL ART: Coral & Turquoise Southwest Inspired Nails
I have to say I'm extra excited to share today's nail art design with you because... honestly, it was a bit of a journey to get to it. I had an idea to use this particular stamping image with a certain base... and it didn't look right. So then I tried it with a very similar base to the first one but in a different finish and... hated it. I almost gave up, but then I showed them to my best friend, who is an incredible artist, and she was pretty much immediately able to point out exactly what it was that wasn't working from a design perspective. I ended up leaving it for a few weeks and I wasn't sure that I would try again, but then a lightbulb hit and I decided to give it one more go and pretty much immediately fell in love with it!
Keep reading for more!
So when it comes to the sort of Southwestern style that inspired this, there's definitely a sort of specific vibe that inspired the color story that I went with for this mani. The first was that I obviously needed a neutral base, but I didn't want it to fall into the "nude" category, so I decided to go with this sort of mid-toned taupe that I think sits really perfectly in a neutral undertone. I applied two coats of Sinful Colors' So Daupe! to all of my nails and let them dry down while I worked out the rest of the plan.
I knew I wanted to pull in a pop of turquoise since it's such a staple of that sort of Southwestern vibe, so I grabbed quite a bright turquoise créme shade. Finally, I knew I wanted a pop of a really bright, warm leaning color so I ended up grabbing for a super bright neon coral. I don't necessarily think this is an intuitive color story, but it really is bang on exactly what I wanted.
The problem the first two times I tried this mani was that I used a smoosh to create my base and there was something about the really flowy vibe of the smoosh with the really sharp, graphic stamping that just felt disjointed in a way that didn't work. The lightbulb that hit to inspire this mani was to do really simple horizontal dry brushing on the nails to create a sort of handmade textile sort of vibe. I didn't want it to get too busy or muddy, so I tried to keep the application of the dry brushing fairly light and just relied on the boldness of the colors I chose to give the punch I was looking for, and I think it worked quite well in that regard.
For my stamping, I just kept it simple with one image from the Whats Up Nails B009 Lost In Aztec Stamping Plate applied in black. I really, really like this image and I feel like it could work beautifully with all kinds of different bases. I decided, as I usually do when possible, to alternate the direction of the placement of the image, which ends up being quite subtle overall as far as the design is concerned.
Once I was happy with my stamping, I sealed it in with a nail art top coat and then finished with a generous layer of glossy top coat for shine and volume. And voila!
All Products Used
Sinful Colors - So Daupe!
Color Club - Youthquake
Color Club - Seeing Seagulls
Whats Up Nails - Neither Noir
Apipila Smudge Free Top Coat
Vibrant Vinyls Fast & Hard Top Coat
Whats Up Nails B009 Lost In Aztec Stamping Plate
Whats Up Nails Magnified Clear Stamper & Scraper
Pueen Latex Tape Liquid Peel Off Cuticle Guard
I have to say that I'm really glad that I went for it and decided to give this design one more go once I got the ideal to use this particular technique. Not only do I love how it turned out, but actually doing this vertical dry brush technique has opened up a bunch of other inspirations in the back of my mind so definitely keep an eye out for more mani's using this technique in the future!
Be sure to head over to @pblnails on Instagram to check out the video tutorial for how I did this mani and follow me there to keep up on all of my nail art designs and tutorials!
Thanks for reading!


0 comments