
NAIL ART: Tropical Summer Sunset Reflection Nails

Did I buy the plate I used for this mani specifically because I really, really, really wanted to do some verison of this mani? Absolutely, I did. Did I spend a somewhat ridiculous amount of time looking at photos and art featuring tropical sunsets to decide on my color story? Also yes. Do I feel like it was worth it at the end of the day? Yep. Honestly, I do. I love how this mani turned out, I love the colors I ended up using, and I absolutely love the technique I used to get that tropical sunset base. So yeah, worth it. So worth it.
Keep reading for more!
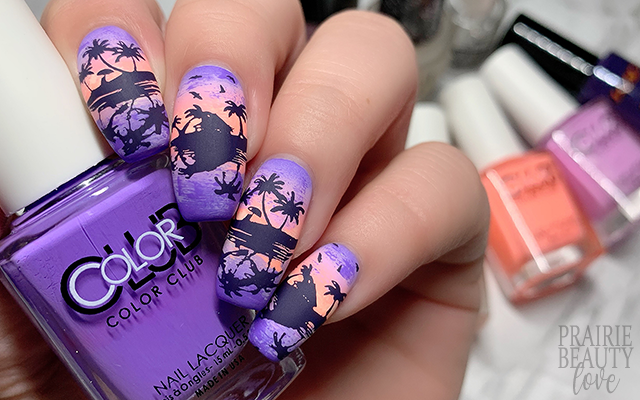
With this being a reflection mani, I knew that I didn't want to do what I would usually do with a sunset or sunrise type of gradient - the colors had to move outwards from the center of the nail for this to work the way that I wanted it to. I definitely kept that in mind as I was choosing the colors I would use for this design. Ultimately, my favorites when I was looking through photos for inspiration for this mani were the ones where there was a sort of peachy/orangey shade at the horizon that moved into a really dusky purple and I knew that I wanted to recreate that.
I went for Color Club Poptastic polishes because they never do me wrong and I decided that I would do a three color gradient to get the look I wanted. I started with a pastel neon coral shade for the center of the nail, a quite pinky toned pale purple, and then finally a quite cool toned amethyst purple for the ends. I also grabbed a lighter pastel peach shade as well to include in my drybrushing.

Once I had chosen my polishes, I started by applying one coat of a nearly-white créme shade to all of my nails and letting that dry down before moving onto my gradient. When applying the polish to my makeup sponge for the gradient, I started with a fairly thick line of the coral at the center of the sponge and then thinner lines of the two purple shades on either side right to the edges of the sponge. I did three passes of sponging on each nail, giving a couple of minutes between coats for drying, to get the desired opacity that I was looking for. Next, because I wanted to emulate that sort of streaky sky look from sunset photography, I went in and added some dry brushing using the same polishes on top of my gradient. I followed the same order and placement as the gradient, lightly drybrushing a few strokes of each color.
For my stamping, I wanted to keep the mani really cohesive, so I decided to go with the two palm tree/tropical images from the plate and just alternate them to break up the design and (hopefully) give the illusion of one flowing coastline.) Rather than going with a black stamping polish, which I would normally do, I decided that I wanted to stick with that purple vibe and keep it just a teensy bit less sharp so I grabbed for a really deep purple stamping polish. When applying my stamping, I tried to maintain that horizon line at the center of the nail as best I could and I think it worked out pretty well.
Once I was happy with my stamping and had my edges all crisped and tidied up, I sealed everything in with a nail art top coat and then finished with a matte top coat to bring down the shine. (For some reason, I almost always go with a matte finish on these sort of landscape style nail designs.)

All Products Used
Color Club - Astro-Naughty
Color Club - First Class Sass
Color Club - East Austin
Color Club - Diggin' The Dancing Queen
Color Club - Pucci-licious
KADS - C16 Dark Purple
Apipila Smudge Free Top Coat
OPI Matte Top Coat
KADS Nature 028 Stamping Plate
Whats Up Nails Magnified Clear Stamper
Pueen Latex Tape Liquid Peel Off Cuticle Guard
I'm seriously so in love with this how this design turned out. It was, admittedly, a little touch and go in the middle and I wasn't sure how the finished product was going to look, but ultimately I think it's really beautiful and I love the texture that the drybrushing ended up giving that base. I think sometimes it's those little things that really end up making the difference.
To see how I did this mani, be sure to check out the video tutorial over on Instagram @pblnails and follow me there to keep up with all of my nail art designs!
Thanks for reading!


0 comments