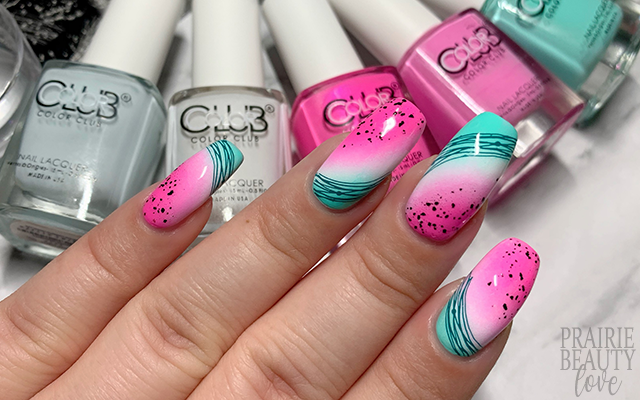
NAIL ART: Abstract Watermelon Gradient Nails
Today's mani is another one I've had in mind to do all summer, but for some reason my brain decided that it had to wait until August. I'm not entirely sure why that's the case, but here we are with end of the summer fruit inspired nails. (Hint: There will be another fruit mani coming up...) These watermelon nails were actually inspired by a mani that I saw a while back from a professional nail tech over on Pinterest, apologies that I can't find the original anymore, and I knew that I wanted to figure out how to do a version of it using traditional polish. Sometimes gel polish designs can be a little bit tricky to translate into regular polish designs, but I actually love, love, love the way this one turned out!
Keep reading for more!
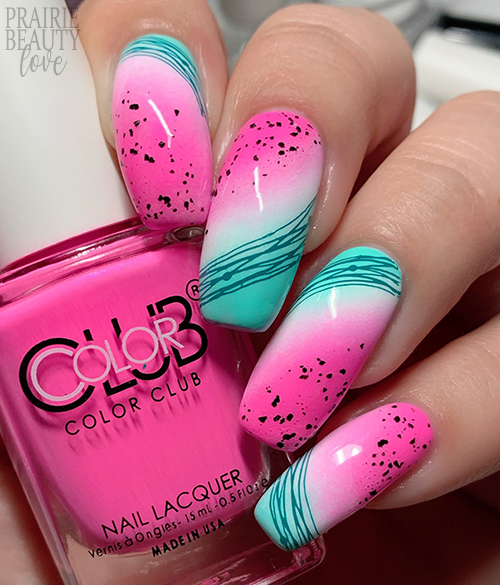
For the base of this mani, I knew I wanted to do a gradient that would create the base of the design and really drive home the watermelon inspiration. I decided that to get the best version of that, I would do a sort of curved application of the polishes on the sponge and keep the design at a diagonal on the nails rather than following the natural curve of the nail, which is actually what felt most intuitive. For the polishes, I went with a pastel neon turquoise, white, a light pastel neon pink, and then a bold very cool toned neon pink. The two pinks, I think, were really important to create that transition and really drive home the real watermelon sort of look.
To actually do the gradient, I started by applying a nearly-white créme base to all of my nails and let that dry down completely. Next, I did my sponging, which in this case took two passes to get the opacity and blend that I was looking for. I also used two different sponges with the polish applied exactly the same, but in the opposite direction, so that each of my four main nails would be different. In case you're wondering, I generally just match my thumb to my pinkie since I never photograph it.
Once I was happy with the gradient, I went in with the details to bring more of that watermelon inspiration. I feel like watermelon really lends itself to something like this because it's really easy to break down the elements that make up a watermelon and then put them back together graphically. I started by using a black speckled topper over the bolder pink parts to create the sort of vibe of seeds. I just sort of randomly brushed and then tapped the topper on and I think it managed to get the kind of scattered application that I was going for. Next, I added some stamping in a darker teal color to infer the look of the watermelon rind. I went for a sort of spider gel type of image that had a soft curve to it that worked really well with the shape of the gradient. I wasn't too precious about this part and I just sort of slapped it on towards the edge of the design and called it a day.
Once I was happy with the overall design, I sealed it in with a nail art top coat and then finished with a generous layer of quick dry glossy top coat for shine and volume. And voila!
All Products Used
Color Club - Astro-Naughty
Color Club - Blue-Ming
Color Club - French Tip
Color Club - Wicker Park
Color Club - Choose Happiness
Cirque Colors - Spotted
KADS - 028 Lake Blue
Apipila Smudge Free Top Coat
Vibrant Vinyls Fast & Hard Top Coat
Nicole Diary 156 Stamping Plate
Whats Up Nails Magnified Stamper & Scraper
Pueen Latex Tape Liquid Peel Off Cuticle Guard
Honestly, I'm so obsessed with how this turned out that I can't even get over it. I love the way it's very much obvious that the inspiration is watermelon, but at the same time it's a little bit looser and more abstact. Like a deconstructed watermelon mani or something. Also, I have a sneaking suspicion that the Cirque Spotted topper is about to get a lot of play in my nail art. It's been in my collection for a while, but I definitely think we're about to be coming on time to use it. A lot.
Be sure to head over to @pblnails on Instagram to check out the video tutorial for this mani and follow me there to keep up on all of my nail art designs.
Thanks for reading!


0 comments