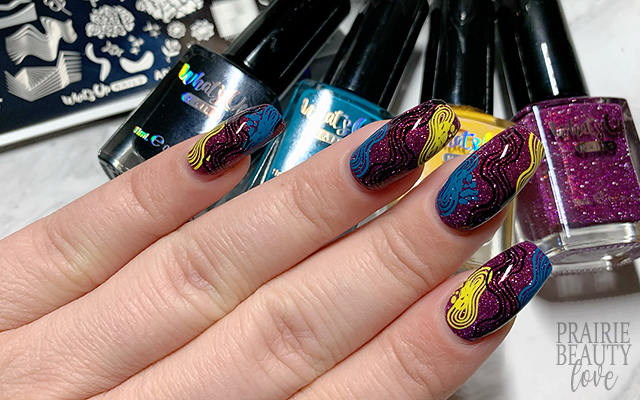
NAIL ART: Bold Reflective Purple Graphic Abstract Nails
In the past year, I've definitely been cultivating my love for abstract nail designs, so of course I was super excited that Whats Up Nails was releasing a new abstract stamping plate with A026 All Lined Up and I was super excited to get into it. Of course, it was literally as I was swatching their Gust Of Wind collection that I had the idea for this mani, so I paused the swatching and just put together this mani right there in the middle of it. It works, I think!
Keep reading for more!
Like I said, I was in the middle of swatching the Gust Of Wind Collection of polishes and something about Plumingo Party just inspired this. This polish is... Okay, so straight up I have tried maybe a handful of polished with reflective glitter in them and I pretty much hated all of them. I mean, don't get me wrong, they've been pretty and I've done some pretty things with them, but I've not enjoyed working with them at all and found the whole process wasn't worth the sparkle... Until this one.
Like seriously, this polish is STUNNING. Even without the flash, this polish has such an incredibly twinkly look and I definitely found it easier to work with than other reflective glitter polishes I've tried. It is still gritty and dries down flat and with some texture to it, but this one smooths out really easily with top coat and makes for a just absolutely gorgeous base for nail art.
For this mani, I started with a base of two coats of Plumingo Party plus one coat of top coat - like I said, I was in the middle of filming my swatch video!
Immediately when I decided I was going to use this base polish for an abstract design, I knew I wanted to include yellow stamping. This type of berry leaning purple pairs really beautifully, I think, with a bright, sunny yellow. Along with the yellow, I decided to grab a bright teal, again for that bright contrast, and then a black to sort of ground the whole thing. I also chose three different images from the plate that felt like they would work well together. I'm a corners sort of girl, admittedly. With all of my nail art, I tend to really utilize the corners of my nails when I'm building a design, and I definitely did that with this one. I kept the smaller images at the corner of my nails, alternating which image was in which color, and then down the middle of the nail I added the long, wiggly image in black on all of the nails.
Once I was happy with the design, I sealed it in with a nail art top coat and then followed with a generous layer of glossy top coat for shine and volume. And voila!
All Products Used
Whats Up Nails - Plumingo Party*
Whats Up Nails - Fab Cab
Whats Up Nails - Not A Big Teal
Whats Up Nails - Neither Noir
Apipila Smudge Free Top Coat
Sweet & Sour Lacquer Gloss Sauce Top Coat
Whats Up Nails A026 All Lined Up Stamping Plate*
Whats Up Nails Magnified Clear Stamper & Scraper
Pueen Latex Tape Liquid Peel Off Cuticle Guard*
* = PR Sample
I'm seriously so happy with how this turned out. In general, it's a really simple mani and it actually came together really, really quickly but I the color story and abstract stamping images really bring a lot of bang for your buck (or for your time, as it were.) I highly recommend literally every Whats Up Nails product that I used here - and if you're reading this on the day of posting you can get them all at 35% off during their Black Friday sale!
If you want to see the video tutorial for this mani, you can check it out over at @pblnails and follow me there to keep up on all of my nail art designs!
Thanks for reading!


0 comments