
NAIL ART: Bold Vampy Fall Sunflower Nails
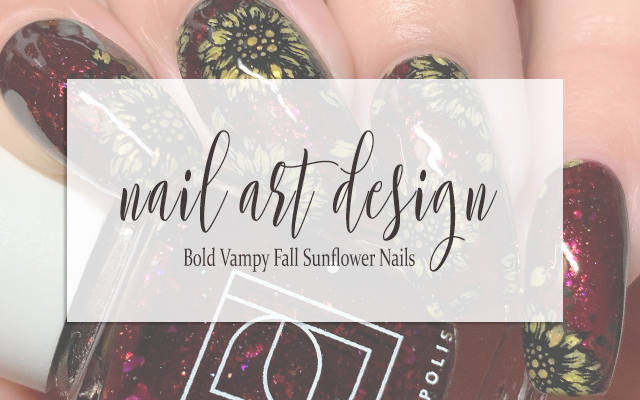
I always get excited about new stamping plate releases from Whats Up Nails, so I couldn't wait to get my hands on the 4 new plates that launched earlier this month. Of course, being in Canada it took a minute for them to get to me, but as soon as they did I tore right into using them and the first mani I knew I had to do as soon as I first saw the B075 Somewhere In Bee-tween Stamping Plate* was this one featuring this stunning sunflower image. It just had to happen.
Keep reading for more!
To make this mani seasonally appropriate - keep in mind, we're already well into the snowy season here on the Canadian prairies, so even fall can feel a little removed - I knew I wanted to put the flowers onto a vampy background. Taking the vampy bit full on literally, I decided to grab for Painted Polish Dead But Delicious, which is a vampy blood red jelly base packed with shifting iridescent and metallic flakes. It really is basically the definition of a vampy red shade (in all of the ways) and I knew that it would be a perfect pairing with the warm yellows I was planning to use for the sunflowers.
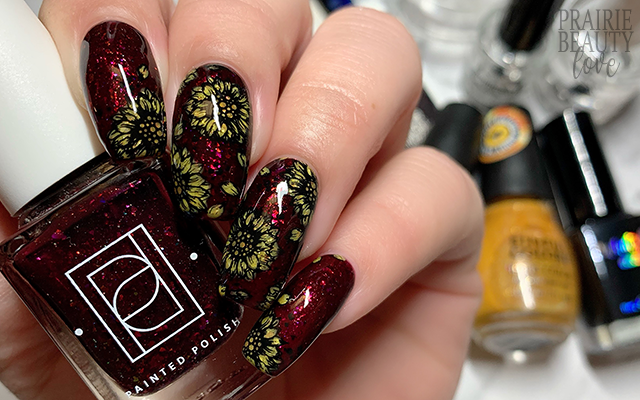
To start, I applied two coats of Dead But Delicious to all of my nails and let those dry down while I worked on my reverse stamping.
For the reverse stamping, I decided to go with two different shades of yellow, which in person felt pretty distinct but ended up being a little bit more similar than I had hoped once they were on the nails. Still, I went with a slightly deeper, slightly more golden honey yellow for the middles of the sunflowers and then a brighter, more sunny yellow for the petals. Both of these polishes are jelly formulas that contain gold and copper flakes and I think this formula really gives a pretty look to the design. I used a very small dotting tool to fill in the images and let them dry down on the stamper. For my middle two fingers, I decided to use the whole image and then for the rest of my fingers I used only one flower applied at a corner of the nail to sort of bring everything together.
Once the stamping images were dry to the touch, but still a little squishy to the touch on the stamper head, I applied a thin layer of sticky base coat to the nail and let it dry down until it was tacky before transferring. I like to do this step one nail at a time to ensure the best transfer.
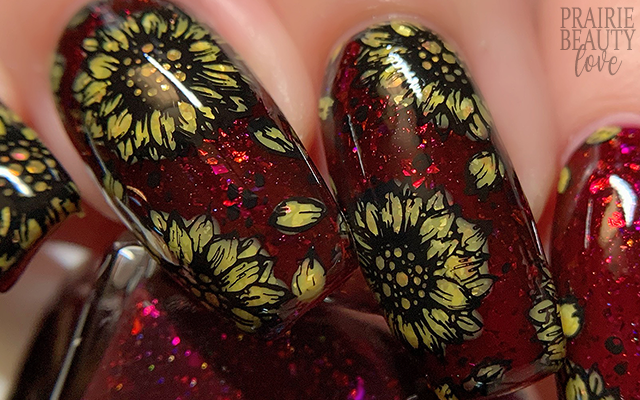
Once I was happy with my design, I sealed everything in with a nail art top coat. Admittedly, this is one instance that I probably could have used a glitter smoothing top coat to level out any lumps from the decals, but I didn't and instead I just went in with a pretty generous layer of glossy top coat and voila!

All Products Used
Painted Polish - Dead But Delicious
Sinful Colors - Save The Bees
Sinful Colors - Busy Being Queen
Whats Up Nails - Neither Noir
Apipila Smudge Free Top Coat
Sweet & Sour Lacquer Gloss Sauce Top Coat
Orly Bonder Base Coat
Whats Up Nails B075 Somewhere In Bee-tween Stamping Plate*
Whats Up Nails Magnified Clear Stamper & Scraper
NailStuff.ca Dotting Tool**
* = PR Sample / ** = PR Sample/Affiliate NailStuff.ca code TRYSH for 10% off first order.

To say that I'm obsessed with how this turned out would be a distinct understatement. Interestingly, the contrast on this design was a little bit less intense than I was expected it to be, but I actually love that about it. It, to me, gives it the sort of vibe of 90s grunge - florals, but make them a little dark and dirty, if that makes sense.
Be sure to head over to Cosmetic Proof and See The World In PINK for more fall themed nails for this week's #CBBxManiMonday! And, of course, if you want to see a video tutorial for this design, just head over to my Instagram @pblnails to check it out and follow me there to keep up on all of my nail art.
Thanks for reading!


0 comments