
NAIL ART: Pastel Rainbow Gradient Feather Nails

I really am having a resurgence of excitement for nail art now that we've transitioned into spring and I feel like I can delve into the designs and styles that I love for this time of year. I particularly, for some reason, love to do gradients in the springtime and I've been fully leaning into that for the past couple of weeks. There are a lot of different ways that you can sponge on gradients, of course, and I have to admit that I pretty much love them all, but this style of vertical rainbow gradient will always hold a special place for me and it seemed like a good time to dive into one.
Keep reading!
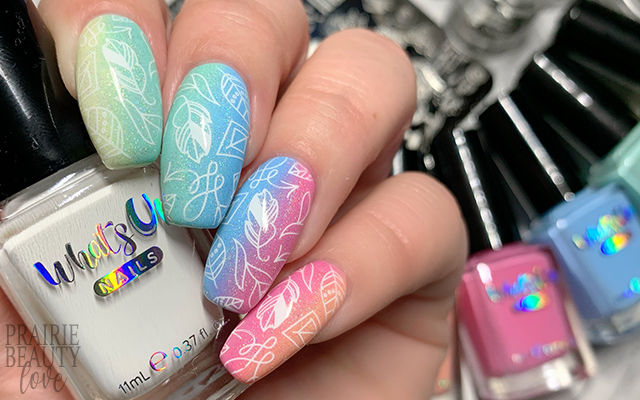
For this gradient, I decided to once again reach for the Whats Up Nails Bloominosity Collection*, which is turning out to be one of my favorite releases of the year so far. Not only is has Whats Up brought out gorgeous pastel stamping polishes, which I've personally been excitedly waiting for from my favorite stamping polish brand, but this collection works beautifully to create other styles of nail art as well. For this mani, I use five of the six shades to create this beautiful, full spectrum pastel gradient base across my hand.
I started by applying a créme polish in an almost white shade (you could also just use white, I just generally hate white polish and avoid it like the plague) and I let that dry down completely. Next, you apply stripes of two polishes vertically to your makeup sponge and pounce those on, carrying one shade onto the next nail moving across your hand - so, moving from pinkie to thumb, peach and pink, pink and blue, blue and green, green and yellow, yellow and peach. For this mani, I did two layers of sponging to get the opacity and blend that I was looking for.

Once my gradient was complete, I decided to go in with a holo top coat on all of my nails to both add some extra sparkle and interest as well as to smooth out that blend even futher. I used my personal favorite holo top coat for this mani. KBShimmer's Prism Break is a superfine linear holo topper that works absolutely perfectly for this application because the particles are really fine and it gives this gorgeous glow without being too overtly glittery. Love it so much!
For the stamping, I decided to keep it super simple using this image from the Uberchic Beauty Boho Chic stamping plate. I think the style and the weight of the design is a really perfect pairing for this base design and color story. I alternated the direction of my placement of the image to give the illusion that the pattern is continuous rather than repeating, if that makes sense.
Once I was happy with my design, I sealed everything in with a nail art top coat and then finished with a generous layer of glossy top coat for shine and volume. And voila!

All Products Used
Color Club - Astronaughty
Whats Up Nails - Apricot Horizon*
Whats Up Nails - Cherished Blossoms*
Whats Up Nails - Sky Glider*
Whats Up Nails - Commit Mint Problems*
Whats Up Nails - Egg Crasher*
Whats Up Nails - Blanc My Mind*
KBShimmer - Prism Break
Apipila Smudge Free Top Coat
Whats Up Nails Gloss Over Top Coat*
Uberchic Boho Chic Stamping Plate
Whats Up Nails Magnified Clear Stamper & Scraper*
Pueen Latex Tape Liquid Peel Off Cuticle Guard*
* = PR Sample

I'm obsessed with how this mani turned out. No lie, I'm just obsessed with it and it's exactly what I wanted it to be. I think the Bloominosity polishes performed really beautifully to create this gradient and the stamping image just fits perfectly with the overall design. I'm so in love!!
If you want to see a video tutorial for this design, head over to @pblnails to check it out and follow me to stay up to date on all of my nail designs!
Thanks for reading!


0 comments