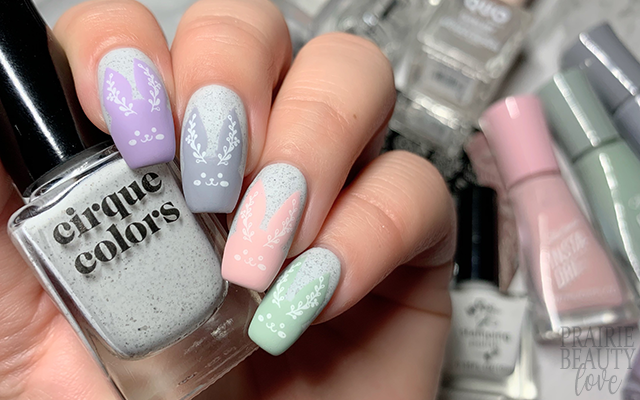
NAIL ART: Muted Pastel Easter Bunny Nails
So the thing is... I don't handpaint often when it comes to nail art, but when I do it's super easy and basic and if it needs finer details I tend to go in with stamping, like I did for today's mani. This mani was inspired by this one, from When Beauty Calls By Georgina on Instagram, but of course I to put a little bit of my own personality into it with a speckled indie base polish, a matte finish, and some seriously chubby little buns.
Anyway, without further ado, keep reading for a closer look!
I very specifically picked up Cirque Colors' Hatch with Easter nail art in mind (although I think it'll get play all year long) and I knew that it would make a really pretty background for this mani. I applied two coats to all of my nails as my base and let them dry down most of the way before moving onto the bunnies. I tried to keep the shades that I chose for the bunnies very, very muted because I wanted everything to be soft, and I also wanted to live in a sort of cool toned place with this mani so I kept that in mind when choosing these four crémes.
Using my favorite nail art brush - the 11mm Nail Art Liner Brush from NailStuff.ca** - I first painted in the shape of the bunny's head and then went in to draw the ears and fill them in. I wasn't too precious about making all of the bunnies look exactly the same, but I did try my best to keep the proportions similar. Next, I went in to fill in the head with the brush straight from the polish bottle. It's just easier and smoother overall that way.
Once my base and bunnies were dry, I went in with my stamping using these two images from the Pict You PY-J037 Stamping Plate along with a white stamping polish - again, just keeping it soft. I started by applying the face, keeping it centered on the bunny head as best I could. Next, for the laurel leaf design on the ears, I picked up the whole image on my stamper but carefully applied each branch individually so that I could place them fairly center on the ears.
Once my stamping was complete, I sealed in my design with a water based top coat and then finished with a layer of quick dry matte top coat - there's just something about an eggshell matte finish for Easter, don't you think? - and voila!
All Products Used
Cirque Colors - Hatch
Sally Hansen Insta-Dri - Racing Rose
Sally Hansen Insta-Dri - Thyme Is Money
Sally Hansen Insta-Dri - Show Steel-er
Sassy + Chic - 914
Clear Jelly Stamper - 002 Jenny's Gonna Love This
Maniology Smudge Free Top Coat
Quo Flash Dry Matte Top Coat
Pict You - PY-J037 Stamping Plate
Beauty Big Bang Clear Stamper
NailStuff.ca 11mm Nail Art Brush**
** Product gifted from NailStuff.ca - new customers can use affiliate code TRYSH for 10% off.
I am very, very much my own worst critic when it comes to hand painted nails (a huge part of why I do them so rarely) but I think this was a sort of perfect design for my skill level - and as such could probably be a great option for just about anyone. I think this would look great even without the stamping at all or you could use a dotting tool to create the face and some flowers for the ears. Seriously, I do think this is nail art that just about anyone could try!
I've got one more Easter mani planned for this year, so check back tomorrow for the last of my bunnies and eggs themed nail art for 2021!
Thanks for reading!


0 comments