NAIL ART: Olive Green Graphic Abstract Nails
I have to admit that when I sat down to do this week's Green themed #CBBxManiMonday nails, I found myself looking for ways to get around the theme because green was just not inspiring me, but you would honestly never know that based on how much I'm completely in love with this mani. Honestly, I'm over here tooting my own horn like an insane person at this point. I stepped away from revisiting old favorite stamping images for this mani because I've gotten a BUNCH of new plates lately and... basically I'm a crow? Anyway, I'm obsessed with how this mani turned out and I'm so excited to share it!
Keep reading for more!
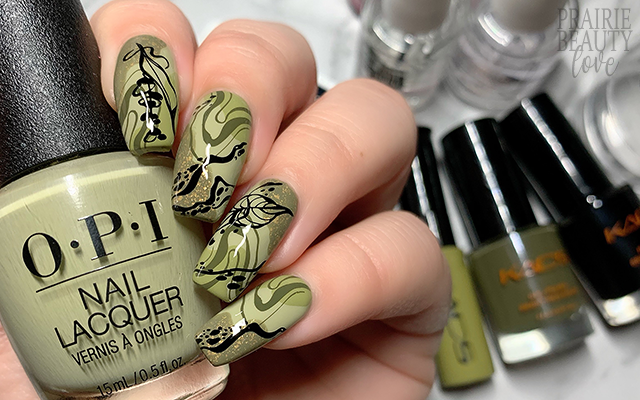
Green is one of those colours that's really interesting because it's so different based on the way the undertones lean. When I was choosing the colours I wanted to use in this mani, I definitely had to root around a little bit to get just the right balance. I actually started with two stamping polishes that I wanted to use in very yellow toned, somewhat muted greens and went from there and it took a minute but I actually love how the colors I pick worked together. I started with one of my all time favorite green polishes - OPI's This Isn't Greenland - as my base and applied two coats of that to all of my nails.
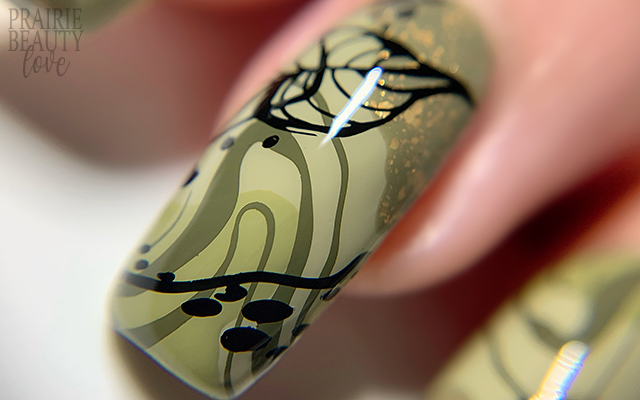
Next, I wanted to add some sort of blobs of color that would work well with that base and strike a balance so that they showed up but weren't too stark. I also wanted to add a little bit of texture at this point because I felt like it would benefit the overall look, so I grabbed for Cirque's Mosaic, which is a sort of dirty olive green crelly that's packed with gold flakes and it did exactly what I was hoping it would. To apply the blobs I really just kept it sort of free form and plopped them on. One thing I've learned when it comes to this kind of technique is that it really only works if you don't get too precious and fussy about it. There has to be an effortlessness to it. I decided to keep them at opposing corners of the nails, with a little bit of drift across the nails, and I think it turned out beautifully.
For my stamping, I ended up using 5 different images from the KADS Fashion 091 Stamping Plate, which I think is a GORGEOUS plate that is really, really on trend right now as far as what's happening in nail art. I actually ended up applying the same image to all of my nails using the deeper olive green stamping polish and I alternated the direction and placement in order to add some visual interest and keep it from looking too samey. Next, I went in with a black stamping polish and added what I think of as the sort of grounding images, the ones that add contrast and depth to the overall design. I went entirely with images that have a combination of soft drifting lines and dots or spots, and for two of them I also used ones that have leaves in them. Figuring out the placement of the black images was definitely the trickiest part, but I love love love how it ended up looking.
Once I was happy with my stamping, I sealed it in with a nail art top coat and then followed with a generous layer of quick dry glossy top coat for shine and voila!
All Products Used
OPI - This Isn't Greenland
Cirque Colors - Mosaic
KADS - 048 Light Matcha Green
KADS - C15 Army Green
KADS - C17 Inkiness
Apipila Smudge Free Top Coat
Cuticula Limitless Quick Dry Top Coat
KADS Fashion 091 Stamping Plate
Whats Up Nails Magnified Clear Stamper & Scraper
Pueen Latex Tape Liquid Peel Off Cuticle Guard
I'm honestly so, so in love with this mani that I'm sort of fighting the urge to take it off and try the exact same thing again in a different color story. Or a skittle. Or. Or. Or. Know what I mean? This is definitely one of those times where this mani is exactly my style and I really, really hope that everyone loves it as much as I do because I'm obsessed.
Don't forget to head over to Cosmetic Proof and See The World In PINK today to check out more Green themed #CBBxManiMonday nails! And, of course, for a video tutorial on how I did this mani, head over to @pblnails on Instagram and follow me there to keep up with all of my nail art designs!
Thanks for reading!


0 comments