
NAIL ART: Spring Sunrise Gradient Silhouette Nails

I've been doing so much abstract nail art lately that for this week's #CBBxManiMonday, I decided to shift gears a little bit and do a mani that I've had in my head for a while and really wanted to do for spring. Admittedly, I did fudge the flowers theme a little bit since this is definitely a little bit more in the grassy and butterflies zone, but I don't think it's enough of a fudge to not get away with it. (Also, I may or may not have had another mani I had hoped to get done this weekend in mind, but ran out of time...)
Anyway, without further ado, keep reading for more about this mani!
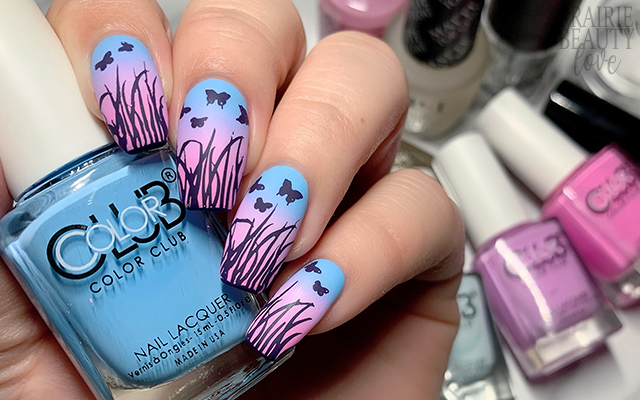
For my gradient, I knew I wanted to so a pink to blue sunrise gradient that very much stayed in the cooler tones. Oftentimes a peachy or coral toned polish would make the base for a gradient like this, but I really wanted to stay away from that because I think the pink to blue vibe works really well for the spring. I started by applying a very, very pale blue polish as the base for my sponging to all of my nails and giving that a solidly good amount of time to dry down so that it wouldn't life. Next, I applied pink, purple and blue polishes that I think would live in a sort of... super saturated pastel zone to my makeup sponge and pounced them onto the nail. It took three passes of sponging for this mani to get the opacity and blend that I was looking for.

Next, I went in with my stamping. I love silhouette stamping over a really beautiful sky gradient, so I was really excited to pull out the KADS Nature 062 Stamping Plate and go in with this grassy butterflies image. I had actually planned on doing the silhouette stamping in black, but at the last minute I decided to grab for a dark purple stamping polish instead to bring in that depth and contrast without being quiet so stark as black would be. For the stamping I actually decided to go in first with the grass at the tips of my nails and then do the butterflies after. This allowed me to place the butterflies slightly differently for each nail, making each nail just a little different.
Once I was happy with my stamping, I sealed it in with a nail art top coat and then followed with a matte top coat to take down the shine - and voila!

All Products Used
Color Club - Astro-Naughty
Color Club - Take A Chill Pill
Color Club - Diggin' The Dancing Queen
Color Club - Wicker Park
KADS - C16 Dark Purple
Maniology Smudge Free Top Coat
OPI Matte Top Coat
KADS Nature 062 Stamping Plate
Whats Up Nails Magified Clear Stamper
Pueen Latex Tape Liquid Peel Off Cuticle Guard

I swear, every single time I do a gradient I have the same reaction - which is to remember how much I love to do a gradient and think I should do them more often. So who knows... maybe there'll be some more gradients coming in the near future!
Be sure to head over to Cosmetic Proof and See The World in PINK for more floral themed nail art for this week's #CBBxManiMonday! And also be sure to head over to @pblnails and follow me there for video tutorials of all of my nail art designs!
Thanks for reading!


0 comments