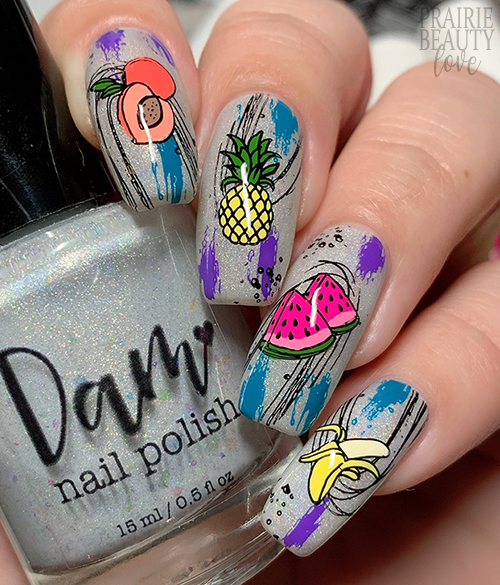
NAIL ART: Bold & Bright Summer Fruit Nails
Last week when I posted my Abstract Watermelon Gradient Nails, I promised that there would be more fruit to come - and here is the fruit! I've actually had this mani in mind all summer as well, or some version of it at least, but I tend to talk myself out of doing reverse stamping because it tends to feel like a lot so it took me a while to get here. In all honesty reverse stamping isn't actually as much work as I convince myself that it is and the result always seems to be worth the work you put in to get to it.
So... let's get to the fruits, shall we?
When it came to the color story for this mani, I knew I wanted to go bold and bright with the fruits with a neutral background that featured some pops of color. Because I didn't have just the right white base for this look, I decided to go with a Dam's Opal, which is a very light silver holo base with some really subtle flakes through it. It makes such a beautiful base and it's so neutral that I knew it would help to really pop the bright colors I was using for the fruits. I applied two coats of Opal to all of my nails as my base for this mani.
I actually didn't choose the pops of color for the background until I had chosen the fruits I would be using, because ultimately I wanted those to sort of add a more rainbow vibe to the overall color story. When I was choosing the fruits, I knew that I needed them to be similar in scale so that they would feel cohesive across the nails, and I also knew I wanted them to all be summer fruits. From there, I chose the colors that would fill in the fruit images and then decided on teal and purple for my pops of color in the background.
I used a really fine nail art brush to fill in the images and I tried to keep them fairly straightforward while adding as much dimension and visual interest as I could without getting too fancy with it. Once the images were dry to the touch on my stamper, I applied a thin layer of sticky base coat and let it dry down until it was tacky before moving onto my stamping. I started by applying the teal and purple splotches of color at the base and tip of the nail. Next, I went in with this sort of looping spider gel image in black, alternating the direction that I applied it from and angling it towards the center of the nail so that the fruit would be placed directly on top. Finally, I transferred the fruit images directly from the stamper onto the nail, trying to center them as best I could.
Once I was happy with the design, I cleaned up my edges and then sealed everything in with a nail art top coat. I finished with a generous layer of quick dry glossy top coat, though I so kind of wish I had gone with a glitter smoothing top coat first since there was a little bit of lumpiness where the fruit images were once everything was dry - but live and learn! Voila!
All Products Used
Dam Nail Polish - Opal**
Color Club - East Austin
Color Club - Modern Pink
Color Club - All That Razz
OPI - Bee-Hind The Scenes
OPI - Don't Tell A Sol*
Dimension Nails - Powered By Plants**
Dimension Nails - Sand Monitor**
BioSculpture - Retro Rock*
Whats Up Nails - Neither Noir
Whats Up Nails - Not A Big Teal
KADS - C07 Bright Purple
Apipila Smudge Free Top Coat
Vibrant Vinyls Fast & Hard Top Coat
Pict You PY-F027 Stamping Plate
Pict You PY-X011 Stamping Plate
Whats Up Nails Magnified Clear Stamper & Scraper
Born Pretty Store Nail Art Brush*
Pueen Latex Tape Liquid Peel Off Cuticle Guard*
* = PR Sample, ** = Available from NailStuff.ca, affiliate code TRYSH for 10% off first order.
I mean... what do you say. It's definitely fruit, right? I'm not entirely sure that this one is my personal style, but it's super fun and I can't deny that I really like how it all came together. And honestly, I can't imagine ending a summer without doing some fun fruit nails, so I'm glad I managed to sneak a couple in here right at the end.
Be sure to head over to Cosmetic Proof and See The World In PINK for our last Summer themed #CBBxManiMonday of the year! Also, if you're not following me over at @pblnails, head over there for video tutorials on all of my nail art designs!
Thanks for reading!


0 comments