

Generally when I sit down to do my nails, I have at least some kind of loose idea of what I want to do. I mean... if I didn't, I'd spend a lot of time sitting at my nail desk wracking my brain, so it's definitely best that I do it this way. That being said, sometimes I sit down and I have no idea and I just decide to play. Admittedly, while really fun this is generally not a good way to get to great nail art, but this time around I feel like it turned out sort of great and I legitimately had no idea what I was going to do here - even right in the middle of doing it!
So just keep reading to see what I did, I guess!
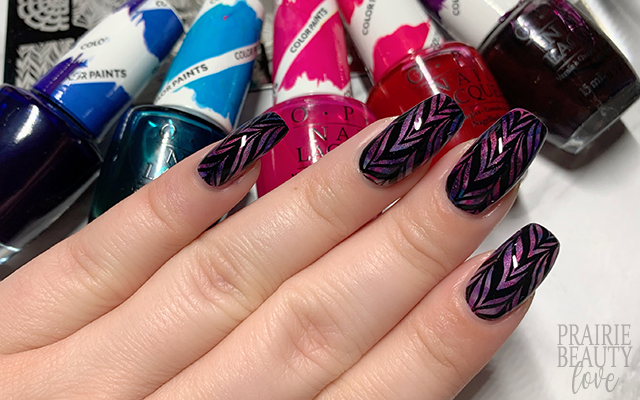
I've had a bunch of the OPI Color Paints in my collection for probably about a year now, but I hadn't gotten around to using them until I was looking through my drawers for polishes for something else and decided I wanted to pull them out and play a little bit. I ended up grabbing 5 of them from my drawer - a red, a pink, a purple, a blue and a teal.
It occurred to me to try them out sort of the way that you would do an alcohol ink, so I started by applying a few small dots of each color over the nail with a mind towards spreading them evenly across the nail. Next, I grabbed a small brush dipped in acetone and just sort of lightly dabbed at the polish to spread it and get that sort of marbled look. This was, admittedly, a little bit of a trust-the-process situation at this point, but I felt like it had good bones.
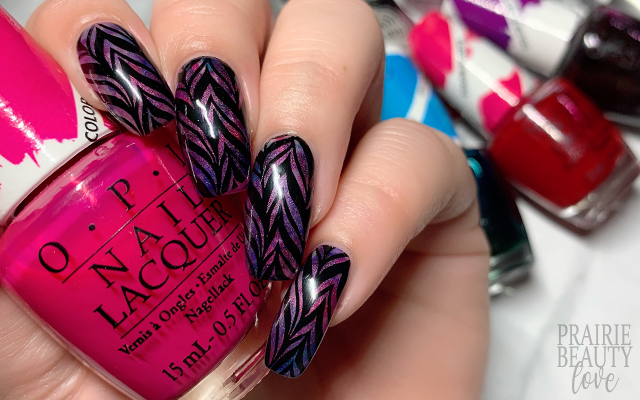
I decided at that point that I wanted to add a shimmery topper to sort of bring the whole thing together, so I grabbed for one with a really fine iridescent magenta shimmer and applied one coat to all of my nails.

Once I had completed the base, I knew that I wanted to add some really intense black stamping to really ground the mani and pop that base. Something that I think is really cool is how black graphic stamping can really boost the vibrancy of a dark base. I decided to go with a water marble stamping design because it felt like a good fit for the marbled look of the base, so I grabbed for the Pueen Marble Paradise 01 Stamping Plate along with their black stamping polish and chose this image that has an almost chevron sort of feel to it. I applied the image to all of my nails in the same direction for cohesion and I think it did exactly what I hoped it would.
Once I was happy with my stamping, I sealed in the design with a nail art top coat and then followed with a generous layer of quick dry glossy top coat. And voila!
All Products Used
OPI - Indigo Motif
OPI - Turquoise Aesthetic
OPI - Purple Perspective
OPI - Pen & Pink
OPI - Magenta Muse
Julep - Tyra
Pueen - Black Jack*
Apipila Smudge Free Top Coat
Cuticula Limitless Quick Dry Top Coat
Pueen Marble Paradise 01 Stamping Plate*
Pueen Clear Stamper*
Pueen Latex Tape Liquid Peel Off Cuticle Guard
* = PR Sample

Ahhh I'm so happy with how this turned out. Honestly, somewhere in the middle of doing it I was pretty sure it was going to just end up being a mess, but it was yet another trust the process moment and as soon as I applied my top coat and everything really popped it just ended up being exactly what I wanted it to be. Maybe not quite summery, but still really lovely and I'm happy about it.
If you're interested in actually seeing this technique in action, head over to @pblnails on Instagram to check out my video tutorial and follow me there to keep up on all of my nail art designs!
Thanks for reading!


0 comments