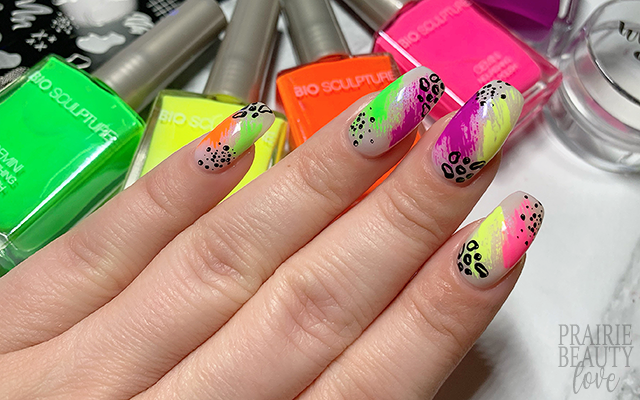
NAIL ART: Summer Neon Drybrush Abstract Nails
I have a confession to make - this week's #CBBxManiMonday is actually one that I did a while back and never posted. After a pretty big DIY project for the house this weekend, I just did not have it in me to put together any nail art so I decided to finally give this mani its time to shine. As we're getting to the end of the summer, I will admit that I'm also finding myself already shifting gears into fall mode so putting together Summer themed mani's is definitely becoming trickier as my mind says it's cozy time.
Keep reading for more!
One of the first drybrush mani's that I ever successfully did was using neon polishes and I think I've had a soft spot for them ever since. For this one, I decided to grab for pretty much the entire BioSculpture Gemini Polish Live Life Loudly Collection* of neon polishes, which are absolutely gorgeous, to create what I'm sort of thinking of as a deconstructed gradient across the nails. Maybe? Maybe I'm thinking too hard about this...
Anyway, to start I decided to go with a milky white base with a subtle shimmer running through it as my base. As a fervent hater of an opaque white base, these types of polishes are a life saver when I want a brighter base for nail art that will really pop the design. For this mani, I used two coats of Essie's Treat Me Bright from their Treat Love Color range. I applied two slightly thicker coats to build a little more opacity to the base, but this is still quite a sheer polish and did show visible nail line.
For the dry brushing, I decided that I wanted to basically have the look of each nail connecting to the one next to it, almost like the brush stroke was continuing from one nail to the next. When I was deciding the order of the colors, I went against my usual inclination to go in rainbow order and instead went with more contrasting pairings for each nail because it felt like it would add visual interest. To apply, I removed most of the polish from the nail polish brush and then went in and applied a few strokes of each color at a diagonal moving towards the center of the nail and then repeated on the next nail from the opposite direction. (Sometimes I think I make simple instructions unnecessarily complicated...)
For the stamping, I kept it really simple. I grabbed my beloved Nicole Diary L36 Stamping Plate and chose two smaller images for this mani. The first is this sort of cluster of small misshapen loops and the second just a small spatter of dots. Because I wanted the stamping to have strong contrast and pop against the neon, I applied them using black stamping polish and alternated the positioning to sort of make it look random when viewed all together.
Once I was happy with the design, I sealed it in with a nail art top coat and then finished with a generous layer of quick dry glossy top coat - and voila!
All Products Used
Essie TLC - Treat Me Bright
BioSculpture Gemini - Belle Of The Bop*
BioSculpture Gemini - Limelight*
BioSculpture Gemini - Poco Pop*
BioSculpture Gemini - Sunshine Sway*
BioSculpture Gemini - Violet Vibes*
Whats Up Nails - Neither Noir
Apipila Smudge Free Top Coat
Sweet & Sour Lacquer Gloss Sauce Top Coat
Nicole Diary L36 Stamping Plate
Whats Up Nails Magnified Clear Stamper
Pueen Latex Tape Liquid Peel Off Cuticle Guard
Honestly, I feel like a drybrush design is, for me, one of those go to's that I always know I can go for when I want to create some texture and interest in the base of a mani, but it can also very much be the star. Also, if you haven't checked out the BioSculpture Live Life Loudly Collection* yet, I highly recommend giving it a look because these polishes are across the board absolutely gorgeous and I highly recommend!
Be sure to head over to See The World In PINK today for more summer themed nails for #CBBxManiMonday. Also, be sure to head over to @pblnails to see my video tutorial for this mani and follow me there to keep up on all of my nail designs!
Thanks for reading!


0 comments