When I was first thinking of ideas of how to use the Manitude x Sip It Stamping Plate, today's mani didn't even occur to me. In fact, I have some other mani's coming up that will feature the designs that initially drew me to pick up this particular stamping plate. In fact, I was actually initially thinking that there was no way I would be able to make these particular designs work and then... lightbulb! Immediately this design started coming together in my mind and I just absolutely had to get it onto my nails. Cue immediate obsession!
Keep reading for more!
As the base for this mani, I decided to do a pretty standard gradient... and then I changed my mind to a somewhat more complicated gradient that I think most people will probably miss when they look at this mani until I tell them. Not entirely sure why that gives me such a thrill, but it does!
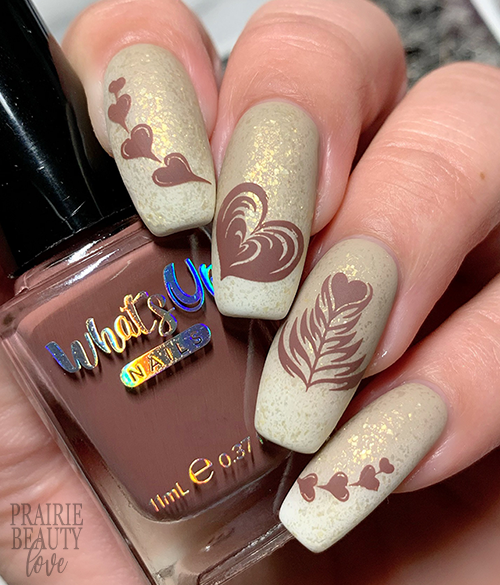
For my middle two fingers as well as my thumb, I went with a traditional sort of french fade gradient, with a beige nuge polish toward the base of my nail and a really crisp white at the tip. For my first and pinkie finger, though, I had already decided that I was going to use these sort of swooping images, so I decided to apply my gradient to mimic that shape. I kept the placement of the beige at the base and the white at the tip, but I curved the application of the polishes so that the white tip came up at a sort of angle on those two outer nails. Like I said, it's super subtle and probably no one will notice, but I love the way it turned out.
Before I went in with my stamping, I decided I both wanted to smooth out the blend of my gradient and also add some texture to that gradient base, so I went in with a really soft golden flakie topper that I think really managed to elevate the whole design overall. Next, I went in with my stamping. As always, I kept scale and the sizes of my nails in mind when choosing which image would be placed on each nail. I also decided to do a more nail filling image on my finger and more of a wide, squatty image towards the tip of my middle finger to keep them from being too samey. I applied all of the images using a milk chocolatey stamping polish from Whats Up Nails that I think works beautifully with the late vibes of this mani.
Once I was happy with the overall design, I sealed it in with a nail art top coat and then finished with a matte top coat to take down the shine. And voila!
All Products Used
OPI - Coconuts Over OPI
OPI - Alpine Snow
Essie - As Gold As It Gets
Whats Up Nails - You Mocha Me Happy
Apipila Smudge Free Top Coat
OPI Matte Top Coat
Manitude x Sip It Stamping Plate
Pueen Cosmetics Clear Stamper*
Pueen Latex Tape Liquid Peel Off Cuticle Guard*
I swear, I am so, so glad that I didn't write off these particular stamping images because I am just completely obsessed with how this mani turned out. I feel like it all just came together with some much cohesion that it's undeniable. While I do think I might have wasted my time a little with that really subtle detail of the swooping gradient, I really do think it's a gorgeous (if really, really subtle) detail that I personally enjoy, which makes it worth it. Love!
Be sure to keep an eye out next week for some more Coffee & Tea themed nails featuring the Manitude x Sip It Stamping Plate! And, as always, be sure to head over to Instagram and follow me @pblnails for video tutorials of all of my nail art designs!
Thanks for reading!


0 comments