
#HalloweenNails202212 Nails Of HalloweenColor ClubessieHalloweenHalloween NailsPict YouStarrilyWhats Up Nails
HALLOWEEN NAIL ART: Gradient Holo Tip Spiderweb Skittle Mani

I have to be totally honest. After my Purple Holo Tip Gradient Spiderweb Nails, I really did think that I would leave this particular technique to the side for this spooky season, but I just couldn't resist doing a slightly different and more colorful version. I mean, really, I think I would have pretty easily been able to create at least a handful of distinctly different versions of this mani for Halloween with ease, but I definitely wanted to change it up somewhat. Maybe. I don't know. I'm pretty in love with how this one turned out though!
So keep reading for more!
This is one of my absolute favorite techniques to use as a base for nail art and it was actually inspired by one of my all time favorite polishes - which was, of course, both limited edition and also Ulta exclusive - which made it pretty much impossible for me to get my hands on a second bottle of as my original bottle started getting lower and lower. And now, since I've started doing it, it has become a favorite because it's both super easy and also really versatile for use as a nail art base.
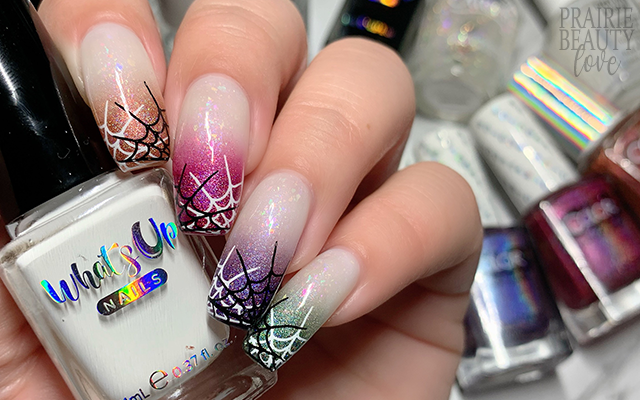
Essentially this is a jelly sandwich or pond mani, really. I start with one coat of a sheer white polish, in this case Essie's Sheer Luck, which has a little bit of subtle shimmer to it. Next, I apply a flakie topper in a sheer base, in this case my absolute favorite all time flakie topper Starrily's Unicorn, which has a gorgeous rainbow of iridescent flakes in it. And finally I do one more layer of my sheer white to encapsulate the flakies so that they give a glowing from within look. I love, love, love this technique and I feel fairly confident that I'll use it pretty much as long as I keep doing nail art.

Now for the actual nail art, which starts with the holo gradient tips. I chose five really bold Color Club linear holo polishes from my collection for this mani. I wanted a lot of impact and I wanted each color to really show up, so it was important that I chose ones with a lot of punch. To apply them to the nail, I use a makeup sponge like I would with any gradient, and I apply one stripe of the holo polish and then directly next to it I apply a clear polish. This helps you to get a smoother blend on the nail than if you were to just sponge on the holo by itself. I did three passes of sponging with each of these nails because I really wanted to get as much impact and holo punch as possible.
For the stamping, I kept it really, really simple. I chose a small triangular spiderweb image that I knew would work well coming from the corners of my nail and I started by applying it in one direction in white, alternating which side of the nail I placed it on, and then repeated the process on the other side of the nail using the same stamping image in black. Super simple and easy actually.
Finally, once I was happy with the design, I sealed everything in with a nail art top coat and then followed with a generous layer of quick dry glossy top coat to just amp everything up. And voila!

All Products Used
Essie - Sheer Luck
Starrily - Unicorn
Color Club - Rock On
Color Club - Under Pressure
Color Club - That's Rich
Color Club - Sidewalk Psychic
Color Club - What A Gem
Color Club - Club Clear
Whats Up Nails - Neither Noir
Whats Up Nails - Blanc My Mind
Apipila Smudge Free Top Coat
Sweet & Sour Lacquer Gloss Sauce Top Coat
Pict You PY-J050 Stamping Plate
Whats Up Nails Magnified Clear Stamper & Scraper
Pueen Latex Tape Liquid Peel Off Cuticle Guard

Honestly, this is without a doubt my favorite nail art technique personally. I think it's just super impactful and versatile and I always, always love the final design when I use this technique. (Except one time, but we shall never speak of that again. I did not share it and all evidence has been deleted. We don't talk about Bruno?)
If you're not already following me over at @pblnails, be sure to head over and check out video tutorials for all of the nail art designs I post here on the blog and follow me there to stay up to date on all of my nail art - including new designs every day in October!
Thanks for reading!


0 comments