
#HalloweenNails2022#NailArt12 Nails Of HalloweenHalloweenHalloween NailsManitudenail artnailsOPIRogue LacquerWhats Up Nails
HALLOWEEN NAIL ART: Pretty & Playful Kawaii Ghost Nails

I have to say, I'm feeling very excited about doing super cute Halloween nail art this year - likely in large part due to some of the absolutely adorable Halloween stamping plates I picked up for this year's designs. One thing that seems to be true every Halloween season is that you really can't go wrong with adorable ghost nails. I mean, sure, there's absolutely a ton of room for creepy, but there's also something to be said for keep it cute and playful during spooky season as well. Anyway, it was with that particular spirit that I decided to lean all the way in with this pink and cute ghost mani!
Keep reading for more!

When I was choosing the base for this mani, I knew I wanted to keep it either pink or purple to just lean all the way in on the adorable girliness of it all, but it actually took me some time to finally settle on a base polish. I finally settled on Rogue Lacquer's Nostaglic Nights, which is a PPU polish from earlier this year that I actually find a little bit difficult to use as a nail art base because it's so incredibly impactful. For this mani, though, with the very bold, high contrast spiderweb images and the stark black and white of the ghosts, it sort of felt perfect.
To start, I applied two coats of Nostaglic Nights to all of my nails and let those dry while I worked on my ghost decals.
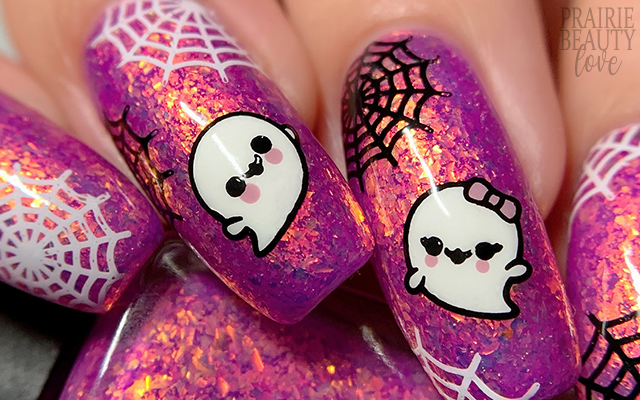
Because I was going all in on the cuteness, the first thing I added to each of my ghost images was pink dots directly below their eyes to give them rosy cheeks because... cuteness, okay? I also used the same pink to full in the bow on the one ghost. Next, I just filled them in white. Super simple. If you find reverse stamping stressful or difficult (because it definitely can be) these might be the perfect images for you because they have thick lines and not really any itty bitty parts.
When the decals were dry on the surface but still flexible, I applied a thin layer of sticky base coat to my nails and let that dry down until it was tacky. I started by applying spiderweb images towards the base of the nail to help me with the placement of the ghosts. Once the ghosts were transferred, I added another partial spiderweb to each nail to help fill in some bits that felt a little bit sparse, and I also added spiderweb stamping to the outer nails as well.
Once I was happy with the overall design, I sealed it in with a nail art top coat and then finished with a generous layer of quick dry glossy top coat. And voila!

All Products Used
Rogue Lacquer - Nostalgic Nights
OPI - Alpine Snow
OPI - Seven Wonders of OPI
Whats Up Nails - Neither Noir
Whats Up Nails - Blanc My Mind
Apipila Smudge Free Top Coat
Cuticula Limitless Quick Dry Top Coat
Orly Bonder Base Coat
Manitude x Too Cute To Spook Stamping Plate
Whats Up Nails Magnified Clear Stamper
Pueen Clear Stamper
NailStuff.ca Dotting Tool**
Pueen Latex Tape Liquid Peel Off Cuticle Guard
** = Affiliate ~ NailStuff.ca code TRYSH.

I have to say, I've been really, really impressed with the quality of the Manitude stamping plates that I've tried and I'm just so, so glad that I picked this one up because it's so packed full of really adorable Halloween images that you can mix and match to create all kinds of designs. Honestly, I have so many ideas featuring this plate that I can't wait to try, so keep an eye out.
Are you following me over @pblnails on Instagram yet? Be sure to follow me there to keep up on all of my nail art designs and for video tutorials for every mani I post here on the blog!
Thanks for reading!


0 comments