
#HalloweenNails202212 Nails Of HalloweenDimension NailsHalloweenHalloween NailsManiologynail artnailsOPIWhats Up Nails
HALLOWEEN NAIL ART: Smoky Purple Smoosh Ouija Board Nails

I have to be honest... trying to plan 31 brand spankin' Halloween themed mani's every year isn't just daunting, it feels pretty much impossible. So, to fill out this year's Halloween Nail Art designs, I've definitely always planned on going back and re-imagining some of the mani's I've put together in previous years. One of the mani's that I wanted to go back and re-imagine this year was my Shifty Glow Ouija Board Nails from last year, but I did want to bump it up a little bit so I took a bit of inspiration from this mani from @ashxmcgrath. I think the intersection of those two inspirations made a very, very me mani and I'm pretty happy with it!
Keep reading for more!
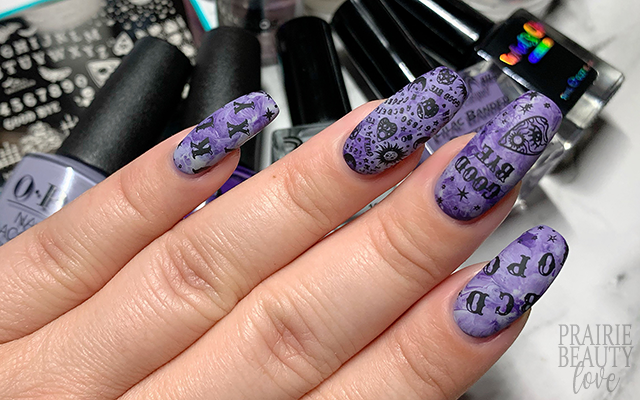
I knew that I was going to start out this mani with a smoosh - I mean, I absolutely love a smoosh and it's, in my opinion, the best way to get a really pretty marbled background without too much fuss. I ended up going with a four color smoosh for this one because I really wanted to get a good amount of texture in the finished design. I went with a royal purple, an ashy lilac, a soft dove grey, and a sort of ashy periwinkle because I really wanted to stay in that cool toned purple zone but, again, bring a lot of texture.
To do the smoosh, I started by applying one coat of the ashy lilac shade (Dimension Nails Lilac Banded Butterfly) to all of my nails as my base. Next, I applied a latex cuticle barrier - this is a must step for doing a smoosh mani if you want to make clean up easier. Finally, once both of those were dry, I applied a handful of dots of each of the four polishes sort of randomly to the head of my stamper and then pounced it onto my nail until I got the marbled effect that I was looking for. For this type of marble, I recommend leaning a little more heavily on the amount of polish you put on the stamper head because it helps to create a smoother, more flowing sort of marble look.

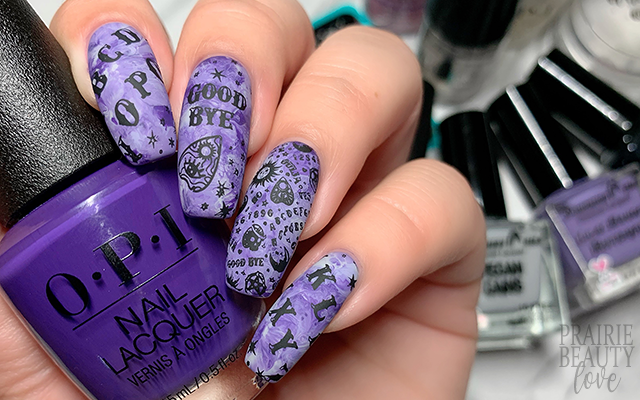
Next, for the stamping, I kept it very, very similar to the inspiration mani that I did last year, though I did pretty change up the middle finger a little bit. For my first and pinkie fingers I applied the letters images from either side of the ouija board and then also added a smattering of stars to fill out the edges as well. For my ring finger and thumb (not pictured) I applied the full cover image that sort of included all of the different elements of the ouija board. And finally, on my middle finger, I applied the small planchette image first, then the words GOOD BYE as though they were being pointed to, and finally added some more stars to that nail as well.
Once I was happy with the overall design, I sealed everything in with a nail art top coat before finishing with a layer of matte top coat to bring down the shine. And voila!
All Products Used
Dimension Nails - Vegan Gains**
Dimension Nails - Lilac Banded Butterfly**
OPI - Kanpai, OPI!
OPI - Mariachi Makes My Day*
Whats Up Nails - Neither Noir
Maniology Smudge Free Top Coat
OPI - Matte Top Coat
Maniology M071 Supernatural The Spirit Speaks Stamping Plate
Whats Up Nails Magnified Clear Stamper
Pueen Latex Tape Liquid Peel Off Cuticle Guard*
* = PR Sample, ** = Affiliate NailStuff.ca ~ code TRYSH

A risk that you run when you recreate an old mani that you loved is that the new one doesn't hold up, but I do actually think that I like this one even better. I love the way the smoosh gives a sort of witchy, playful sort of vibe and then the matte finish really brings everything together. Also, I love the different way I did the middle finger this year - it does just sort of feel like a better design choice overall, in my opinion. Toot toot! <-- my own horn, I know!
Are you following me over @pblnails on Instagram? Be sure to head over there and drop a follow to stay up to date on all of my nail art designs along with video tutorials!
Thanks for reading!


0 comments