HALLOWEEN NAIL ART: Spooky Smoky Smooshy Tree Nails
THIS POST IS IN PARTNERSHIP WITH PUEEN COSMETICS.
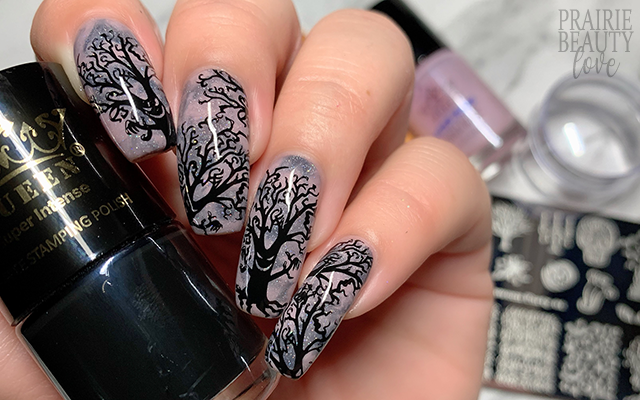
There's just... something about a craggy, spooky tree silhouette that I just absolutely love. Not even just for Halloween, I just love the look of a beautiful sky set off with that dark silhouette of a tree. All of this to say - of course I had to sneak one more creepy tree mani in here before the end of the spooky season. I mean... right? Anyway, I loved this single tree image from the Pueen Halloween Party 01 Stamping Plate so much that I decided to play around with the placement and use it on every nail!
Keep reading for more!
This is another one of those times when this is my second go at this mani. The first time around I loved the stamping, but I just hated the background so I decided to give it another go and this time create a sort of smoky, spooky background with a two color smoosh. Admittedly, I don't often stick to only two polishes for a smoosh, but because I wanted this one to be sort of soft and subtle overall I figured it would be the best option. I decided to go with a dusty mauve and a smoky cool toned grey, both with holographic flakes in them, to get a sort of cool toned neutral effect in the end with these subtle pops of sparkle. I have to admit - it turned out better than I expected it to and I think it backs a perfect backdrop for the stamping.
Now, one thing I've really loved playing with lately is using a single stamping image for my entire mani but not really allowing it to look like it's all the same image at a glance - if that makes sense at all. For this particular mani, I decided to center the single image on only ring finger (that's the one in the video, so it made sense) and then turn and adjust the stamping on the rest of my nails in order to make each one look unique. For my middle and pinkie fingers, I ended up applying the same image twice at opposite angles in order to fill the nail without really having the face in the trunk visible.
Once I was happy with my stamping, I sealed it in with a nail art top coat and then finished with a generous layer of glossy top coat for shine. And voila!
All Products Used
ILNP - Internship
ILNP - Reign
Pueen - 805 Black Jack*
Apipila Smudge Free Top Coat
Sweet & Sour Lacquer Gloss Sauce Top Coat
Pueen Halloween Party 01 Stamping Plate*
Pueen Chunky Soft Transparent Stamper*
Pueen Latex Tape Liquid Peel Off Cuticle Guard*
* = PR/Sponsored Post
I'm not gonna lie, I'm actually super thrilled with how this mani turned out. I love the smoky smoosh background and the way that the cragginess of the trees plays against it. I also really like that I was able to use this one image across my whole hand in a way that didn't feel samey or repetitive.
If you're interested in any of the Pueen products I used for this mani, they are all available from Amazon and I highly recommend. I also highly recommend you head over to @pblnails on Instagram and follow me there to keep up on all of my nail art designs along with video tutorials!
Thanks for reading!


0 comments