THIS POST IS IN PARTNERSHIP WITH PUEEN COSMETICS.
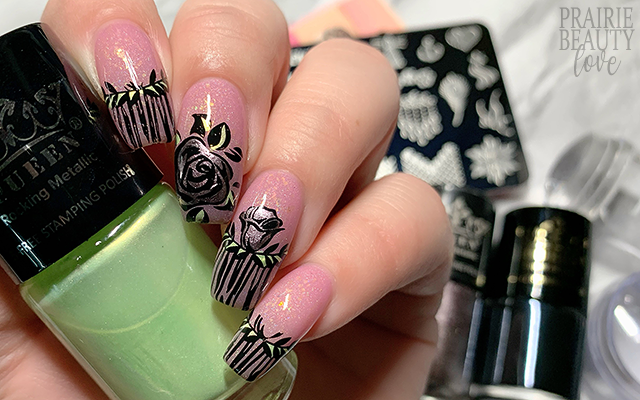
When I got my hands on the Pueen Accent Fun 01 Stamping Plate* recently, I was really, really drawn to this image that looked like a wood grain French tip with a sort of garland and rosebud motif and I knew that I really, really wanted to use it. Of course, I'm a bit of a weirdo and I tend to not be a huge fan of all of my nails being exactly the same, so I spent some time sort of marinating on how I could create a cohesive mani using that image without making all of my nails the same. It wasn't until I realized that I could use the rose image directly next to the French tip one on the plate to create a cohesive vibe that it all came together in my head and I'm super stoked at how it turned out.
Keep reading for more!
Initially I had planned an entirely different color story for this design with red roses and a neutral base polish, but ultimately I changed my mind and decided that I wanted to use this shimmery ashy purple shade for the roses, so I shifted direction. The reason I chose this base polish was actually twofold. First, I really wanted the thermal effect lingering behind those woody tips, but I also really, really loved that in its cold state the shade was almost identical to the shimmery purple with just the difference in texture. It turned out a little bit more spring than fall, but I kinda like that about it.
The way I decided to do the stamping was using two images from the stamping plate to create three distinctly different nail designs. For my first, pinkie, and thumb, I picked up the woody tip design with the rose on it and use a dotting tool to remove the rosebud so that just the wood and garland-y bit were still there. For my ring finger, I just straight picked up that same design but left it whole. And finally for my middle finger I picked up the large rose image. I used the shimmery purple shade as well as this sort of golden apple green shade to fill in bits of the design - the purple for the roses and the green for the leaves on the large rose image and in a thin line along the garland on the rest of the images.
Once my decals were dry to the touch but still flexible on the stamper head, I applied a thin layer of sticky base coat to the tips of each nail one by one. Once that sticky base coat was dried down to tacky, about a minute or so, I then transferred the image to the nail.
Once I was happy with my design, I sealed everything in with a nail art top coat and then followed with a generous layer of glossy top coat for shine and volume. And voila!
All Products Used
Pueen Cosmetics - 805 Black Jack*
Pueen Cosmetics - 605 Love Affair*
Pueen Cosmetics - 603 Golden Delicious*
Pueen Cosmetics Accent Fun 01 Stamping Plate*
Pueen Cosmetics Chunky Soft Transparent Stamper*
Pueen Cosmetics Clear Jelly Transparent Soft Stamper*
Hearts & Promises - 90210
Apipila Smudge Free Top Coat
Sweet & Sour Lacquer Gloss Sauce Top Coat
Orly Bonder Base Coat
* = PR Sample/Sponsored Post
Like I said - not really fall appropriate, but I'm thrilled with how this turned out. Honestly, I wasn't sure that what I pictured in my head would look the same on the nails, but it really did come out just the way I wanted it to.
If you're interested in any of the Pueen products I used to create this mani, they're all easily available over on Amazon and I continue to be impressed with the performance of all of the Pueen products I've tried.
Thanks for reading!


0 comments