
NAIL ART: Dripping Honey Bumblebee Nails

So today's mani was definitely a bit of a game of inspiration telephone, which I have to admit I really, really love. I take so much inspiration from other nail artists, whether it be a mani like this that leans more towards being a recreation or whether someone else's work gives an idea that grows into something else. So I was inspired by this mani from @iamdeliasnails, who was inspired by @nailing_painting, who was inspired by @hannys_manis, who was inspired by @polish_half_full. Honestly, I think this line of inspiration is one of my favorite things about this mani.
Keep reading for more!
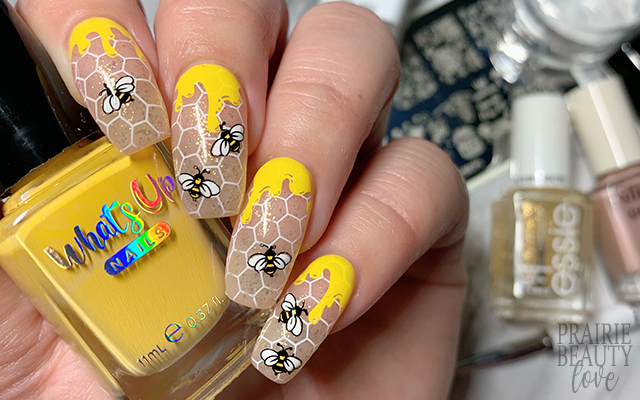
Like the inspiration mani, I knew that I didn't want an opaque base, but because my nail beds are not currently looking their best I needed a sheer nude base that would add some camouflage. I went with Cirque's Georgette, which is a sort of perfect beigey pink nude shade that works absolutely perfectly on my skin tone to add camo without color. I went with one coat to keep it really sheer. I also loved the look of the gold flakes in the inspo mani, so I grabbed for a VERY oldie but goodie from my collection in Essie's As Gold As It Gets. In my opinion, this is one of the best polishes Essie ever made and it's a tragedy that it isn't in their permanent collection It's just the absolute perfect gold topper and I'm currently on the hunt for something to take its place.

For the stamping, I kept it really, really simple. For the bees, I picked up the full cover image with the swirly bees and isolated the ones that I liked the best, using a teensy nail art brush to fill them in, letting those dry while I worked on the rest of the design. Once I was ready to do the stamping, I applied a thin layer of sticky base coat to really grab the images and let that dry down until it was tacky. I applied the honeycomb image in white, because I wanted it to have a good amount of contrast with the base. Next, I went in with yellow and applied the dripping honey image at the base of each nail. I did my best to shift the placement of the honey drips to give each nail a unique look, which is actually really easy with this extra wide image. Finally, I transferred the bee images, angling and placing them sort of randomly on the nails.
Once I was happy with the design, I sealed everything in with a nail art top coat and then finished with a generous layer of glossy top coat. And voila!

All Products Used
Cirque Colors - Georgette
Essie - As Gold As It Gets
Whats Up Nails - Neither Noir*
Whats Up Nails - Blanc My Mind*
Whats Up Nails - Fab Cab
Apipila Smudge Free Top Coat
Whats Up Nails Gloss Over Top Coat*
Orly Bonder Base Coat
Whats Up Nails B075 Somewhere In Bee-tween Stamping Plate*
Whats Up Nails Magnified Clear Stamper & Scraper
Pueen Latex Tape Liquid Peel Off Cuticle Guard*
NailStuff.ca 4mm Nail Art Brush**
* = PR Sample / ** = PR Sample/Affiliate

I'm so, so madly in love with how this mani turned out. Oftentimes, I convince myself that reverse stamping designs are so much work and not worth it in the end... and then I do them and I'm almost always in love with the final product. This is definitely a case just like that. I'm so thrilled with how this turned out.
Be sure to check out Cosmetic Proof and See The World In PINK for more #CBBxManiMonday nail art! And as always, check out my Instagram @pblnails for the video tutorial for this mani and be sure to follow me over there to keep up with all of my nail designs - including ones I don't post here on the blog.
Thanks for reading!


0 comments