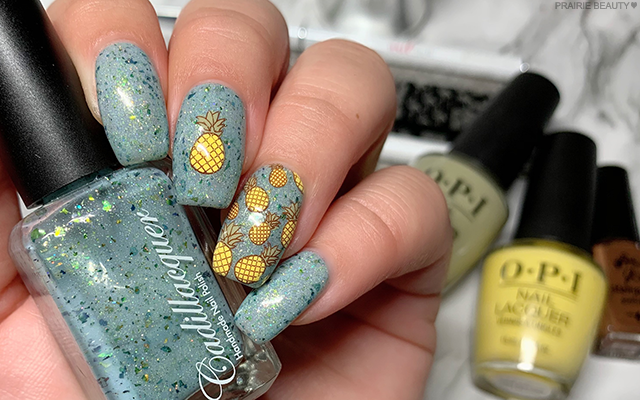
NAIL ART UPDATE: Vintage Pineapple Reverse Stamping Nails
Hey guys! Over two years ago now, I posted Summer Pineapple Nails 2 Ways and that post continues to be one of the most viewed nail art looks I've ever done, with the teal and yellow version being the clear favorite of the two. Of course, when I look back at it now, I see the things that I would have done differently and how my taste has changed - and, of course, just how much my nails have grown. Anyway, I decided to change it up just a little, mute down the colours for a more vintage look, and recreate it!
Keep reading for more!
For this mani, I wanted to stick to the same colour family as the original, but use a more unique and complex polish in a slightly more muted tone, so I reached for one of my absolute favorites of the past year, Cadillacquer's Summer Rain* (seems appropriate, right?) This polish is a STUNNER, I'm kind of obsessed, and I highly recommend picking it up. It was actually gifted to me from NailStuff.ca and if you're interested in picking it (or anything else they stock) please feel free to use my affiliate code TRYSH for 10% off your order.
For the stamping, I used the same plate as I did the first time around, Born Pretty Store BP-L076, but rather than black, I reached for a brown stamping polish from Clear Jelly Stamper called You Had Me At Chocolate. Brown just made a lot more sense to me for pineapple nails. To fill in the images, I used a dual ended dotting tool as well as a reeeeeally tiny nail art brush, both from NailStuff.ca, along with OPI's Don't Tell A Sol* and This Isn't Greenland, for a more muted look.
As usual, I waited for the polish to dry on the stamper head (it really doesn't take long) and applied a coat of nail foil glue to aid in a smooth transfer. You can use a sticky base coat for this step, but I've got nail foil glue and it really does make it a no brainer. I cleaned up using a metal cuticle tool followed by a clean up brush dipped in acetone, which really helps to melt the image into the nail and get smooth edges.
I finished with a generous coat of Seche Vive Top Coat and voila!
Cadillacquer - Summer Rain*
Clear Jelly Stamper - You Had Me At Chocolate
OPI - Don't Tell A Sol*
OPI - This Isn't Greenland
Seche Vive Top Coat
Born Pretty Store BP-L076 Stamping Plate
NailStuff.ca Clear Stamper & Scraper*
NailStuff.ca Nail Art Brush*
NailStuff.ca Dotting Tool*
As will often be the case now, if you want to check out a video tutorial of how I put together this mani, head over to @pblnails and follow me there for pictures of all of my nail art and nail swatches as well as video tutorials of select nail art looks. I'm having so much fun filming my nail designs and I'd love for you to come and check it out!
It's funny to me just how different the exact same mani can be when you use slightly different versions of similar colours, but I really dig it. We all definitely have our own tastes when it comes to what we like on our nails and I'm learning (especially as I dig into summer nail art this year) just how much the more muted shade options please my brain. Ultimately, I'm not sure this one blows the original out of the water for me, but I really love how it turned out. AND I love this base polish to the moon and back (which is why I've used it so many times in mani's here on the blog.)
If you're interested in picking up Cadillacquer's Summer Rain* or any of the tools I used to create this mani, they're available at NailStuff.ca and you can feel free to use affiliate code TRYSH for 10% off your order!
Thanks for reading!


0 comments