
#CBBxManiMonday#NailArtAffiliateBIO SCULPTUREKADSnail artnailsNailStuff.caPR SamplesSally HansenWhats Up Nails
NAIL ART: Neon Watercolor Smoosh Marble Mani
Today's mani is sort of an amusing one for me because when I sat down to try out the technique I used for it, I actually felt pretty confident it wasn't going to work, at least not the way I was hoping. In the end, though, not only did it do pretty much exactly what I hoped it would, but I fell completely in love with it and now I want to do twenty-six different versions of it in a hyper focus sort of fashion. As I do. Admittedly, I am pushing the #CBBxManiMonday floral theme a little bit this week, since it's definitely more leafy and botanical than floral, but we're going with it because I'm obsessed.
Keep reading for more!

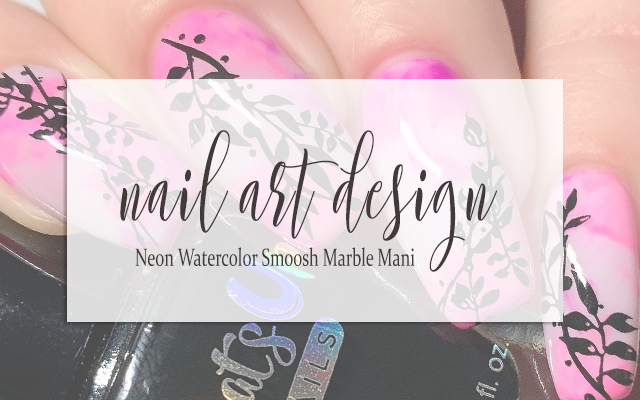
So essentially the idea I had for this mani was to do a smoosh marble - not at all new for me, honestly - but instead of keeping it natural and soft, I wanted to add in two really bold neon colors and see how they would behave in a sheer base to create a marbled effect. I started with a neutral, grey leaning milky polish as the main base for my smoosh and paired it with pink and purple neon polishes from the Bio Sculpture Live Life Loudly 2022 Collection*. I felt like these two colors would work well together and hoped they would show up distinctly while still feeling really cohesive.
For the stamping plate, I decided to go with the KADS Flower 057, which has a really good selection of sort of grungey and playful floral and botanical images with graphic elements. And, of course, for a really strong contrast, I grabbed for my favorite black stamping polish to apply it. I love, love, love this color story, I must say.

To do the smoosh, I started by applying one coat of my milky polish to all of my nails as my base. Next, I applied an even, fairly thick layer of my sheer polish to my nail art mat and then added a couple of dots of each of the neon polishes onto that base. I dragged a dotting tool through the dots a few times to drag the neon through the sheer before pressing my stamper into the polish a couple of times to pick up the marbled polish. I gave it maybe 10-15 seconds to dry down a little bit on the stamper head before pressing onto the nail. For the application, I tried to press the parts of the design on the stamper head that had good marbling onto the nail, but ultimately you just have to kind of hope for the best. Once I finished the smoosh, I wanted to soften it a little, so I grabbed for a different sheer polish which is a little bit less pigmented and a fair bit more pinky toned, and applied a thin coat of that over the smooshing.
For the stamping, I decided to use two different images from my stamping plate that I thought felt had the same vibe and just alternate and shift the placement so that each nail was different. I also tried to find a balance between complementing the base for a really sort of organic flow and also cohesion with the overall design across my hand when I was applying my stamping. Once I was happy with the design, I sealed it in with a nail art top coat and then followed with a generous layer of QDTC for shine and a very gel like appearance. And voila!

All Products Used
Sally Hansen - Dew Peas In A Pod
Bio Sculpture Gemini Polish - Belle Of The Bop*
Bio Sculpture Gemini Polish - Violet Vibes*
Cuticula Neutralizer Base Coat
Whats Up Nails - Neither Noir
Apipila Smudge Free Top Coat
Sweet & Sour Lacquer Gloss Sauce Top Coat
KADS Flower 057 Stamping Plate
Whats Up Nails Magnified Clear Stamper
NailStuff.ca Clear Stamper**
NailStuff.ca Dotting Tool**
* = PR Sample, ** = PR Sample/Affiliate

Am I completely obsessed with how this turned out? 100% I am. I'm completely in love with how the neon showed up in that milky base because it walks a really interesting line between being really soft and delicate almost while also being really bold and impactful - and that is a really hard line to walk. I am definitely invested in playing more in this sort of bright colors + sheer milky marble vibe, so don't be surprised if it pops up here again in the near future.
Be sure to head over to Cosmetic Proof and See The World In PINK to check out more floral themed nail art for this week's #CBBxManiMonday and follow me over at @pblnails for video tutorials for all of my nail art designs!
Thanks for reading!


0 comments