
#NailArtBIO SCULPTURECuticulaHolo Taconail artnailsNicole DiaryPR Samplessummer nail artsummer nailsWhats Up Nails
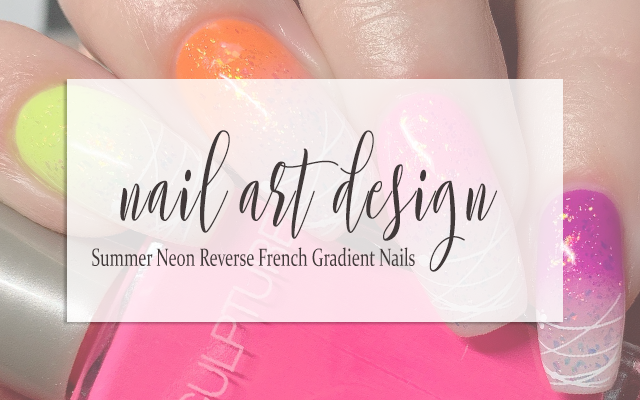
NAIL ART: Summer Neon Reverse French Gradient Nails
After swatching the Bio Sculpture Live Life Loudly Collection* for Summer 2022, I was really excited to try and create some nail art using them. I generally try to hold off on the neons until at least June, but we're almost there and I didn't want to stifle the creativity so I just went for it. This is such a gorgeous neon collection and I suspect that it'll end up popping up here on the blog a lot in the next few months, but for the first mani I did using it, I had a very specific idea that I wasn't entirely sure I was going to love.. BUT I DID.
Keep reading for more!
The initial idea for this mani was based on a couple of mani's I've done in the past with a pastel neon gradient tip and at first that was what I had planned to do for this mani. It wasn't until I stopped and thought about it that I wondered how it would look with the color at the base of the nail and the more sheer milky polish at the tip. Obviously a gradient tip is generally used to hide the visible nail line, but I had a feeling I could make it work.
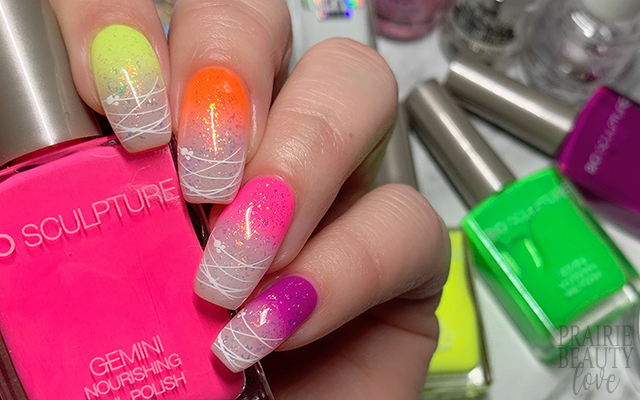
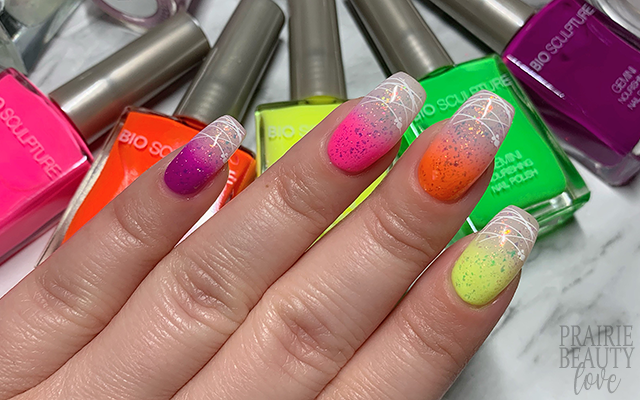
I started by applying one coat of a milky pink sheer polish to all of my nails as my base and let that dry before going in with my sponging. I decided to use 5 of the polishes from the collection starting with the green on my thumb (not pictured) and proceeding in rainbow order to purple on my pinkie. I used the sponging technique to create this mani and I split up my makeup sponge about 1/3 neon, 2/3 sheer so that I got a good smooth blend. It took three layers, I believe, of sponging to get this level of opacity and smooth blend. In the end, I think the combination of those neon polishes and that milky base ended up giving a really beautiful look that could almost give the illusion that it's an acrylic application - which I love.

I almost left the gradient as it was, but in the end I decided that an iridescent flakie topper would add a really nice dimension to the nails and lean into that sort of gel look I was hoping for. A flakie or glitter topper is also great for applying over a gradient because it helps to really smooth out the blend and give more seamlessness to the overall look.
I also decided that I wanted to add a little bit of stamping both for interest and to add a little bit of camouflage to that visible nail line. I decided to use this sort of spider gel look stamping image that has a nice curve to it because it added to that camouflaging aspect. I went with a white stamping polish because I really wanted it to be a more subtle detail and a bolder or deeper color would have added more contrast than I wanted and sort of defeated the purpose. I applied the image to all of my nails, being mindful of where my visible nail line is on each nail.
Once I was happy with the design, I sealed it in with a nail art top coat and then followed with a generous layer of quick dry glossy top coat for shine and volume. And voila!
All Products Used
Bio Sculpture Gemini Polish - Violet Vibes*
Bio Sculpture Gemini Polish - Belle Of The Bop*
Bio Sculpture Gemini Polish - Poco Pop*
Bio Sculpture Gemini Polish - Sunshine Sway*
Bio Sculpture Gemini Polish - Limelight*
Cuticula - Neutralizer Base Coat
Holo Taco - Solar Unicorn Skin
Whats Up Nails - Blanc My Mind
Apipila Smudge Free Top Coat
Cuticula Limitless Quick Dry Top Coat
Nicole Diary 156 Stamping Plate
Whats Up Nails Magnified Clear Stamper
Pueen Latex Tape Liquid Peel Off Cuticle Guard
* = PR Sample

Honestly, I'm kind of obsessed with how this turned out and I'm curious to how I would like it with different colors and designs, so I suspect this is another one of those techniques that's going to end up in the roster from time to time. I don't like to do any one thing too often here on the blog, so it's always good to add more options to the pile. I definitely recommend giving this a go if you're someone who doesn't mind a little bit of visible nail line and you want to try out something different.
Also, if you're curious about the Bio Sculpture Live Life Loudly Collection, be sure to check out my Swatch & Review for a closer look and more info on all six gorgeous neon shades!
Thanks for reading!


0 comments