
THIS POST IS IN PARTNERSHIP WITH PUEEN COSMETICS.

I have to say that this mani was heavily influenced by the Playful Pastel Rainbow Gradient Heart Nails that I did a couple of weeks ago, though I did try to make it very much its own thing. I was just so overwhelmingly impressed with how beautifully the Pueen stamping polishes worked to create a beautiful rainbow spectrum gradient that I knew I had to try again - especially since my brain is apparently fully in a gradient type of headspace at the moment. I have to say.. I'm kind of obsessed with how beautiful it turned out. This is one of those mani's that has the potential to put me in a bit of a slump because it just went so perfectly.
Keep reading for more!

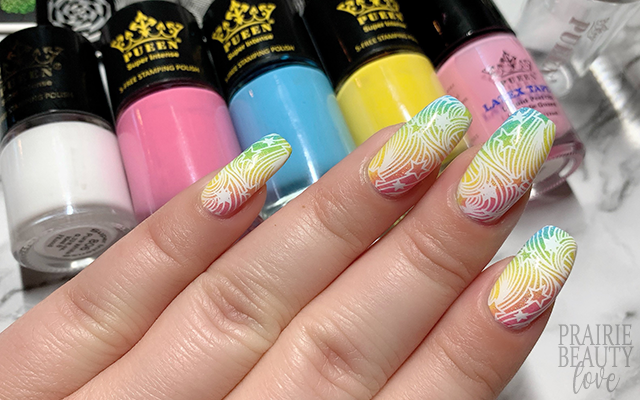
In order to ensure that this mani wasn't too similar to the one that inspired it from a couple of weeks ago, I made two distinct changes to the gradient. First, I applied it at a diagonal, which I think entirely changes up the vibe, and I also changed the order of the polishes to the pink towards the base, yellow in the middle, and blue at the tip. I wanted to put the yellow in the middle because I felt like that sunny center moving outwards to the pink and blue would give a brightness and the playful vibe that I was going for.
To start, I applied a very pale almost-white blue polish to all of my nails as my base. I have a go to polish for this that works every time and applies without the fuss of a white créme. Next, I applied a latex cuticle barrier to all of my nails, trying to get as close to the edge of the base polish as possible, and let that dry down. To get the blend and opacity that I was looking for, I did too passes of my sponging and very much like the first time I used these polished for a gradient it went super smoothly with great results. Because the stamping polish is a little thicker, I do like to follow with a topper just to make sure everything is super smooth and even for my stamping, so for this mani I grabbed for a super fine holographic topper and applied one coat to all of my nails.

For my stamping, I knew I wanted to use this sort swirling star images that just feels incredibly whimsical to me and really feels right with this gradient base. I went with white stamping polish to keep everything feeling light and to maintain that whimsical sort of vibe. More often than not when the image allows for it, I like to alternate the direction of my placement in order to add some visual interest to the overall mani by ensuring that all of the nails don't look exactly the same, and I think it worked particularly well with this image because in feels like they're sort of flowing into each other across the hand.
Once I was happy with my stamping, I sealed it in with a nail art top coat and then followed with a generous layer of glossy top coat for shine and volume. And voila!
All Products Used
Color Club - Astro-Naughty
Pueen Cosmetics - 808 Sweet Pink*
Pueen Cosmetics - 804 Bright Yellow*
Pueen Cosmetics - 802 Baby Blue*
Pueen Cosmetics - 806 Pure White*
KBShimmer - Prism Break
Apipila Smudge Free Top Coat
Sweet & Sour Lacquer Gloss Sauce Top Coat
Pueen Cosmetics Visual Wonderland 01 Stamping Plate*
Pueen Cosmetics Clear Stamper*
Pueen Latex Tape Liquid Peel Off Cuticle Guard*

I am... seriously so in love with this mani that I can barely handle it - and it really isn't doing much to simmer down my currently obsessed with gradients. Like I said in my last post, I suspect that there will be a lot of gradients coming up in the near future here on the blog because that's apparently all my brain is in the mood for at the moment.
If you're interested in any of the Pueen products I featured in today's mani, they are all available from Amazon at a really affordable price point and I absolutely recommend all of them. This post is in collaboration with Pueen Cosmetics, but I am always honest about what I think about products and I'm pretty in love with how these perform. If you're interested in seeing them in action, head over to @pblnails on Instagram to check out the video tutorial for this mani!
Thanks for reading!


0 comments