#HalloweenNails202212 Nails Of HalloweenHalloweenHalloween NailsManitudePolished For DaysUntWhats Up Nails
HALLOWEEN NAIL ART: Soft & Simple Modern Witchy Nails
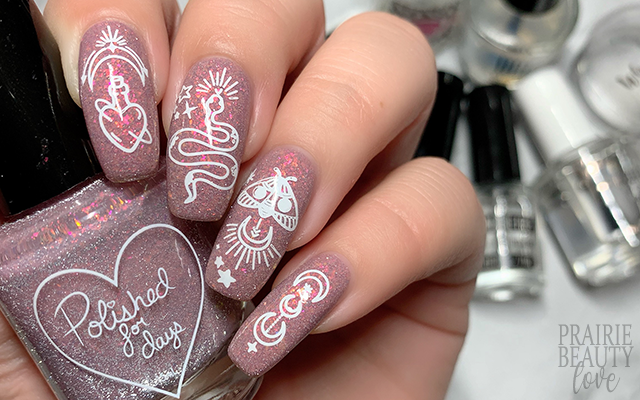
When putting together 31 nail art designs in one specific theme, it quickly becomes apparent that you have to shift a little bit outside of the expected for that theme if you don't want to quickly lose steam and inspiration. And so while today's mani might not scream traditional Halloween vibes, I think that the witchiness of the stamping and the depth and uniqueness of the base polish definitely helps to sort of keep it in that zone. This mani was actually inspired by this one from @manifranny on Instagram because I love love loved the way that she kept it soft and simple - but witchy!
Keep reading for more!
While the base for the inspiration mani was quite neutral and milky, I decided to go in a somewhat different direction. I've actually had Polished For Days' Floating Lights in my collection for a couple of months now but I hadn't gotten around to using it until now. This unique, lit from within flash reflective polish is both absolutely stunning and a wee bit tricky to work with, but the finished look is just... mind bogglingly pretty. This polish is described as a dusty mauve crelly with pink-yellow-green iridescent shifting flakes and silver reflective glitters and was inspired by the lanterns scene in Tangled - and like, honestly, I don't think that anything could be more up my alley. (Except maybe if this didn't have reflective glitters in it, which I have officially decided are not my thing., but I won't go off on a tangent.)
For this mani, I started with one coat of peel off base coat to aid in removal (again, reflective glitters... ugh...) and then I went in with two coats of Floating Lights. Finally, to finish up my base, I applied a glitter smoothing top coat to give myself a really smooth base for my stamping.
For the stamping, I used the same stamping plate as the inspiration mani - the Manitude x Spell Check plate, which I think is an incredible plate. I decided to keep my stamping really simple using crisp white stamping polish and keeping the images centered on the nail without any muss or fuss. With this kind of look, I think cohesion is really important, so I decided to stick with moons, stars and rays of light across my whole hand to bring everything together. I really do think that cohesion as well as proportion are the two most important things when it comes to a mani featuring different single images on each nail. I did do my thumb on this mani, though I never photograph my thumb, but in case you were wondering the image I used was a large crescent moon with a sprig of some sort of herb across it.
Once I was happy with my stamping, I sealed everything in with a nail art top coat and then followed with a generous layer of glossy top coat for shine, smoothness, and a little bit of volume. And voila!
All Products Used
Unt Ready For Takeoff Peel Off Base Coat*
Polished For Days - Floating Lights
Whats Up Nails - Blanc My Mind
Glisten & Glow Glitter Grabber
Apipila Smudge Free Top Coat
Sweet & Sour Lacquer Gloss Sauce Top Coat
Manitude x Spell Check Stamping Plate
Whats Up Nails Magnified Clear Stamper & Scraper
* = PR Sample
I am... seriously so in love with how this turned out and I'm so glad that I resisted that urge inside me to make this more complicated than it needed to be. Sometimes a simple, crisp nail art design with a clear vision and execution is exactly what you need.
Are you following me over @pblnails on Instagram yet? Head over and follow me there to keep up on all of my nail designs - including new Halloween themed nails every day in October - along with video tutorials for all of them!
Thanks for reading!


0 comments