NAIL ART: Fall Sunset Gradient Silhouette Nails
Honestly, you guys, the degree to which I'm excited about today's nail art design is basically off the charts. I've had this mani in mind for ages now, but it fell victim to being one of the designs that my brain convinces me is going to be hard to do and so I should put it off... and then it never gets done. I don't know if this a neurodivergence thing, but it's definitely something that happens to me fairly often, and in the case of this one my brain was entirely lying to me. This is actually a really straightforward design that packs an absolute ton of impact and I'm sort of madly in love with it, if we're being honest.
Keep reading for more!
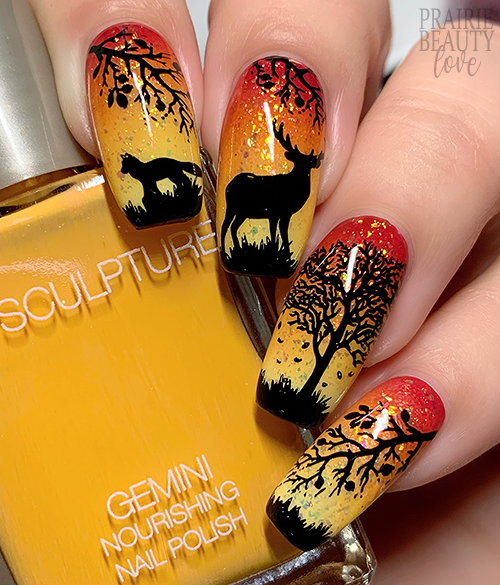
So obviously I really wanted the color story for this mani to be sort of indisputably fall leaning and since the stamping was necessarily black I knew that needed to be established with the gradient base. Immediately I knew that I wanted to lean into the colors of fall leaves and that the mustard and burnt orange shades from the new BioSculpture Pride Of Nature Collection* would be absolutely perfect. It also turned out that I had a pale yellow and a rich warm red also in my collection from BioSculpture to round out the four color gradient I was looking for.
For the gradient, I started by applying one coat of a highly pigmented pale yellow shade to all of my nails as my base. Next, I went in with my sponging. On a fairly tight celled makeup sponge (from the dollar store, which is where I always buy my nail art sponges) I applied thin lines of each polish in depth order starting with the pale yellow, then mustard, then burnt orange and finally the warm red and then pounced the sponge on the nail several times with the red at the base of my nail to apply the polish. It took three passes of sponging to get the desired blend and opacity that I was looking for.
Once I got the look I wanted with the gradient, I decided that I wanted to add a flakie topper both to further smooth the blend and to add a little bit of twinkle to that background. I went in with one coat of Holo Taco Solar Unicorn Skin on all of my nails and let that dry down before moving onto my stamping.
For the stamping, I knew I wanted to add the small grass image at the tip of each nail both to give a clean edge and to bring everything together and I knew that I wanted a combination of foliate and wildlife stamping to fill out the design. I decided to go with a large tree, a fox, a stag, and finally a sort of twiggy image as a sort of space filler. I started by applying the grass image to each nail and then built the rest of the design on top of that. When doing this type of design, I really like to keep scale in mind as far as the size of my nails, and choose my images and placement accordingly, and I think it worked well for this mani - though I am kicking myself for not adding a tiny bunny to my pinkie.
Once I was happy with the design, I sealed it in with a nail art top coat and then followed with a generous layer of glossy top coat for shine and to just bring everything together. And voila!
All Products Used
OPI - Bee-Hind The Scenes
BioSculpture Gemini - Tropical Sunray*
BioSculpture Gemini - Golden Fall*
BioSculpture Gemini - Island Clay*
BioSculpture Gemini - Berry Bush*
Holo Taco - Solar Unicorn Skin
Whats Up Nails - Neither Noir
Apipila Smudge Free Top Coat
Sweet & Sour Lacquer Gloss Sauce Top Coat
Whats Up Nails A021 Leaf Pile Stamping Plate
Whats Up Nails Magnified Stamper & Scraper
Pueen Latex Tape Liquid Peel Off Cuticle Guard
* = PR Sample
Y'all.... I am SO MADLY IN LOVE WITH HOW THIS TURNED OUT. Honestly, as soon as I finished this mani, I even gave myself some props for being good at this - and that is quite rare, since I tend to focus on the imperfections that only I can see over actually being excited about a mani, but I am so excited about this mani. It really is just exactly what I pictured in my mind when I sat down to do it and I couldn't be happier.
Do you want to see how I put this mani together? Be sure to head over to @pblnails on Instagram to check out the video tutorial and follow me there to keep up on all of my nail art designs!
Thanks for reading!


0 comments