
#ChristmasNails202212 Nails Of ChristmaschristmasChristmas Nail ArtDimension NailsNailStuff.caStarrilyUberchic BeautyWhats Up Nails
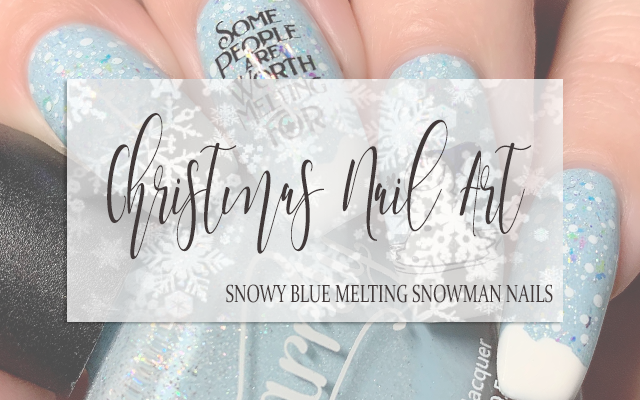
CHRISTMAS NAIL ART: Snowy Blue Melting Snowman Nails
One of my favorite nail art designs from back in 2018 when I was still pretty new to nail art was this adorable little penguin design that I did and I've sort of had it in the back of my head to recreate something similar ever since. Now, four years to the day later, I decided that it was time, except instead of a penguin I was going to go with a snowman and I was going to level up the design a little bit with some other details that speak to experience. Honestly, I feel really proud when I look at how far I've come in the past 4 years when it comes to skill and creativity, and I love revisiting those old designs through these new eyes.
Keep reading for more!

So of course, I wanted to keep the color story for this mani really simple overall, but I didn't want it to be boring. I decided for the base color to go with one of my favorite light blue polishes in my collection, Starrily's Etoile. This is definitely one of those shades that pretty much always makes its way onto my nails at the holidays because it's such a perfect cold blue, if that makes sense. After applying two coats of Etoile, I decided that I wanted to add a little bit more texture and something extra to the base, so I went in with one coat of Starrily's Unicorn, which is a rainbow iridescent flakie topper that, to me, does sort of give the feel of the prisms that snow can sometimes reflect.

Now, for the actual nail art, I wanted to keep it quite simple in very much the same way that the original that inspired this one was. I decided I wanted to use the melting snowman image along with the "Some People Are Worth Melting For" text and keep those to the middle two nails and then just bring together the rest by matching that background. I, of course, filled in the snowman image directly on the stamper (check out the shimmery blue hat and the very, very tiny orange nose!) and then while that was drying I moved on to the rest of the design.
I started by applying the full coverage snowy image to all of my nails, alternating the direction of placement even though it really was sort of an unnecessary detail. Next, I went in the snowy tips on all of the nails except for my ring finger. This is actually super easy and I just sort of blob it onto the tip of the nail using the brush that comes with the bottle. Finally, I went in with the snowman image on my ring finger and the text image on my middle finger.
Once I was happy with the design, I sealed it all in using a nail art top coat and then followed with a generous layer of glossy top coat for shine and volume as well as to really smooth out and bring everything together. And voila!

All Products Used
Starrily - Etoile**
Starrily - Unicorn**
Whats Up Nails - Neither Noir
Whats Up Nails - Blanc My Mind*
Dimension Nails - Julia Butterfly**
OPI - Alpine Snow
OPI - Yoga-ta Get This Blue
Apipila Smudge Free Top Coat
Vibrant Vinyls Fast & Hard Top Coat
Uberchic It's A Season Of Joy Stamping Plate
Pueen Chunky Soft Transparent Stamper
Pueen Clear Jelly Transparent Stamper*
Pueen Latex Tape Liquid Peel Off Cuticle Guard*
* = PR Sample / ** = PR Sample/Affiliate NailStuff.ca ~ use code TRYSH for 10% off first order.

I am seriously so madly in love with how this mani turned out. I really love the icy blue base with the snowy tips and I actually think this would make a beautiful winter/holiday mani even without the addition of the snowman and the text, but since I'm all about that kitchen sink life of course I'm never going to keep it quite that simple - at least not here on the blog!
If you're interested in seeing a tutorial for this design - or any of the other holiday designs I've put together, head over to @pblnails on Instagram and follow me there to keep up on all of my nail art designs!
Thanks for reading!


0 comments