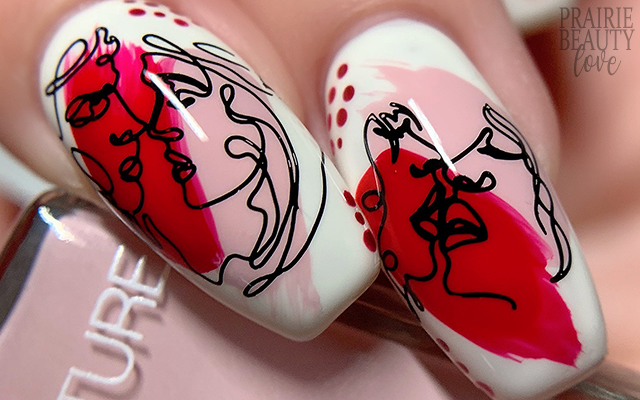
NAIL ART: Red & Pink Abstract Valentine's Day Nails
I'm always, always excited when Whats Up Nails releases new stamping plates because they are consistently my favorite brand of pretty much all of my stamping products - I always come back to them - so I was thrilled when they sent over the new A023 When In Love Stamping Plate* for me try out. Of course the first mani I had to try out with this one was a sort of classic (for me) dry brushed abstract using these beautiful line drawing images from the plate and some really gorgeous polishes that Bio Sculpture Canada sent along for me to try out!
Keep reading for more!
So I received this absolutely gorgeous duo of a bold classic red and a soft muted dusty pink from Bio Sculpture Canada to try out for this Valentine's Day and I knew I wanted to use them both together for this mani. I remember when I was younger people saying that pink and red clash, but I personally to pair the right shades of pink and red together to get really pretty looks on the nails - especially for this particular holiday. I also grabbed for a soft nearly white polish and a deeper red shade that were already in my collection to round out the design.
To start, I went in with two thicker coats of Bio Sculpture's Seafoam, the nearly white shade, on all of my nails as my base. I am personally not a white créme base fan, but this nearly white shade is absolutely beautiful and I actually find the application really smooth and easy without any of the chalky horribleness that turns me off most white créme formulas. Honestly, I've been incredibly impressed with all of the Bio Sculpture polishes that I've tried and highly recommend!
For the drybrushing, I decided to do something a little different from usual with this one. On my pinkie and first finger, I did my usual vertical dry brushing, with the pink coming in from one direction and the red from the other. But for my middle two fingers and my thumb, I decided to try something a little bit different and I went with a diagonal placement instead, keeping the same technique of coming in from opposite sides but just placing it at an angle at the center of the nail instead of up and down. Initially I worried this might look a little funny at the end, but I think the stamping really brought everything together.
For the stamping, I chose all of these sort of line drawing images with three sort of intimate pairs of faces, a simple rose, and for my thumb (not pictured) a simple heart image. As usual for me when I'm choosing individual images for each nail, I chose based on the size of the image and how it would fit each nail to get a cohesive look across my hand. I went with black stamping polish and placed them each towards the center of the drybrushed portion of the image. At this point I decided to go in with that darker red shade and apply some very small dots just to add interest in some of the more bare spots on the nail.
Once I was happy with my design, I sealed everything in with a nail art top coat and then finished with a generous layer of Whats Up Nails Glossed Over Top Coat* for shine and volume. And voila!
All Products Used
Bio Sculpture - Seafoam*
Bio Sculpture - Love*
Bio Sculpture - Royal Red*
Bio Sculpture - Berry Bush*
Whats Up Nails - Neither Noir
Apipila Smudge Free Top Coat
Whats Up Nails - Gloss Over Top Coat*
Whats Up Nails A023 When In Love Stamping Plate*
Whats Up Nails Magnified Clear Stamper & Scraper*
NailStuff.ca Dotting Tool**
Pueen Latex Tape Liquid Peel Off Cuticle Guard*
* = PR Sample // ** = PR Sample/Affiliate NailStuff.ca code TRYSH for 10% off first order.
I have to say, I'm really, really happy with how this mani turned out. I think it did exactly what I was hoping it would do with those images and I think the two different placements of the dry brushing really did come together in the end and give a cohesive look with a little bit more visual interest than if I had done all of the nails the same like I usually do. I can't wait to play around with this stamping plate some more!
Thanks for reading!


0 comments