
NAIL ART: Graphic Pastel Pop Art Skittle Mani

Nail stickers have never really been something I've reached for all that often, but recently when I (like everyone else) got sucked in by the ads for Temu, I decided to pick up a few sheets and see how I liked them. While I don't think I'm going to switch over to being a full time nail sticker kind of girl, I do think they're handy to have in your collection for when you're in a hurry or are looking for a style that might be a little bit more tricky with stamping. Anyway, let's get to the nails, shall we?
Keep reading for more!
Because I tend to find that you can end up with a sort of strange texture left behind when you use nail stickers on top of regular polish - unless you've given your regular polish a solidly long time to dry - I decided to go with gel polish for this one. I've been getting quite a lot of use out of this set of pastel neon gel polishes that I picked up on Amazon on a bit of a whim and because I wanted to keep this one quite summery I reached for them,
I started by applying a peel off base coat to all of my nails and let that dry down completely before I moved on to the polish. I applied two coats to each nail, curing for 60 seconds between each coat.

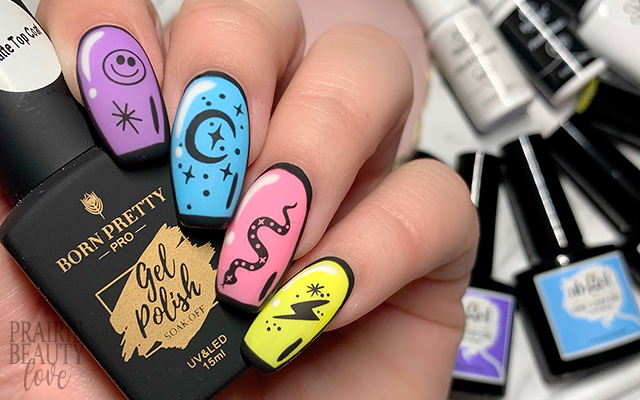
For the nail art, I decided to go for a pop art sort of design, which I felt like really fit surprisingly well with the sticker set I was going to be using. To start, I outlined the entire nail with a fairly thick black line using a gel nail art polish, and cured. Next, I went in with a nearly white nail art polish to add the highlight at the base of the nail and then added a lowlight with the black towards the tip of the nail, and cured.
To apply the stickers, I used a pair of tweezers to first lift them from the sheet and then place them towards the center of the nail. Next, I went in with a silicone tool to really press down the sticker. Admittedly, I had mixed success on this and I did end up with a little bit of lifting around the edges of the larger stickers. Still, it turned out pretty alright in the end.
To finish, I first went in with a glossy gel top coat just to try and smooth everything down, and cured. And then I finished with a layer of matte gel top coat to bring down the shine and drive home the pop art of it all. And voila!

All Products Used
Unt Ready For Takeoff Peel Off Base Coat*
ABGel - B019, B020, B021, B023, B024
Beetles - Cloud Dancer
Beetles - Pirate Black
Born Pretty - Super Top Coat*
Born Pretty - Matte Top Coat*
F909 Nail Art Stickers (Temu)
NailStuff.ca Dotting Tool*
NailStuff.ca Silicone Tool*
* = PR Sample/Affiliate

Honestly, I'm so madly in love with how this design turned out that I decided to post it even though the photos didn't end up quite as crisp as I was hoping they would. I think the stickers ended up looking amazing in real life but lost a little bit of their punch in photos. Either way, I do love this mani and I feel like you can't go wrong with a pop art nail design.
Thanks for reading!


0 comments