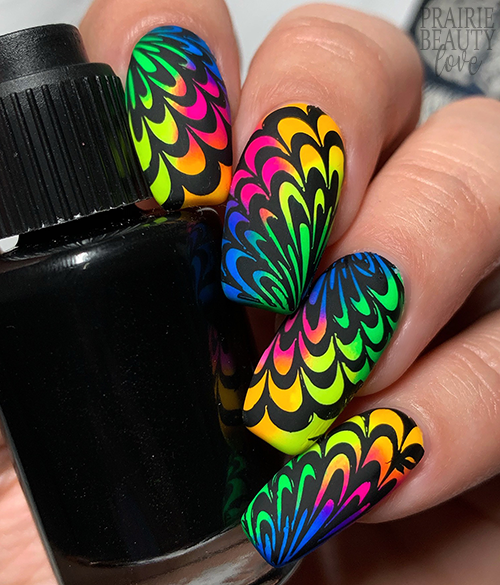
NAIL ART: Rainbow Neon Faux Watermarble Nails
THIS POST IS IN PARTNERSHIP WITH PUEEN COSMETICS.
Did I end up having to do today's mani twice because the first time went great until it went absolutely off the rails? Yep! Was it worth it in the end? Also yep! I've had the neon pigment powders that I used for this mani in my collection for over a year now, but this is the first time I've actually used them and while I think there is probably a bit of a learning curve, I am also super into them and have a lot of ideas of other mani's I might wanna do with them.
But for now, let's get to this mani, shall we?
The best way, according to my research, to use these neon pigment powders is to apply them over gel polish, ideally a white one. Not only will the white really pop those neon colors to give the best punch, but you also need that tacky layer to really grab onto the powder when you apply it. After applying a peel off base coat, which is a must for me with gel nail art, I went in with two coats of a white gel polish with a créme finish. Be sure that you don't wipe off that tacky layer after you cure.
Once the polish was cured and ready to go, I applied the Pueen latex cuticle barrier to all of my nails. I was very careful to get the barrier as close to the polish I could to make for the easiest clean up when I was finished with my nail art. Remember, these are straight up pigments and can absolutely stain your skin if you're not careful.
To apply the powders, I used sponge tip applicators because I found that they gave the best color impact and also made the least mess (which was still some mess, but much less than it would have been with a brush.) I started with blue and moved in rainbow around around the nail to get the best possible blend. Will admit, the blend was a bit iffy overall, but I still think it turned out quite well.
For the stamping, I knew I wanted to use the Pueen Marble Paradise Stamping Plate* using black polish to create a really bold faux watermarble design. I decided to go with one of my favorite images, which is this really classic loopy image. I alternated the direction of placement of the image across my nails to really break things up.
Once I was happy with the nail art, I removed the cuticle barrier and crisped up the edges using a clean up brush dipped in acetone and then finished with a matte gel top coat to bring down the shine. And voila!
All Products Used
Pueen Cosmetics - 805 Black Jack*
Pueen Cosmetics Marble Paradise 01 Stamping Plate*
Pueen Cosmetics Chunky Soft Transparent Stamper*
Pueen Cosmetics Latex Tape Liquid Peel Off Cuticle Guard*
Unt Ready For Takeoff Peel Off Base Coat*
Aimeili Gel Polish - 011*
Neon Pigment Powders
Born Pretty Matte Gel Top Coat
* = PR Sample
I feel like the photos can't even do justice to how bright and cool this looked in person. It felt like it would be a perfect mani for a nightclub or music festival, particularly one with black lights, because it just glows. So cool.
If you're interested in any of the Pueen products I used for this mani, they're all available on Amazon and every single one of them gets my stamp of approval for quality. I've been using many of the products long before I started working with the brand and will continue to use them. Also, for a video tutorial for this design, be sure to check out my Instagram @pblnails and follow me there to stay up to date on all of my nail art designs.
Thanks for reading!


0 comments