#HalloweenNails202312 Nails Of HalloweenColor ClubHalloweenHalloween NailsSally HansenUberchic BeautyWhat's Up Nails
HALLOWEEN NAIL ART: Neon Gradient Spooky Silhouette Nails
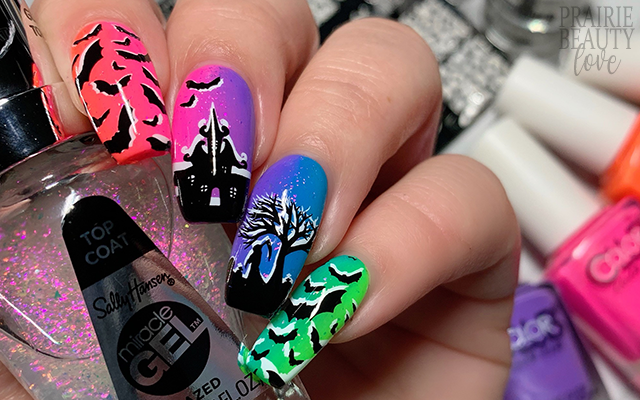
I feel like I can't let a Halloween season go by without doing some sort of spooky haunted house or graveyard silhouette nails - they're just such a staple! That said, I do like to change it up at least a bit every time so I'm not just throwing the same mani's out there every year. For this year's silhouette mani, I decided to go with a neon vertical gradient base, which I think is something I've never done before. And I think it turned out genuinely stunning!
Keep reading for more!
For my gradient base, I chose six neon shades from Color Club to move across the entire hand. Because I wanted the pink to blue gradients at the most prominent fingers (the middle two), I started with yellow at one end and green at the other.
To start, I applied the lighter of the two shades I was using in my gradient to the nail as a base. Obviously I could have gone with a white base, but I find that you have to be really careful that none of the white peeks out at the edges when you do it that way, so I always prefer the lightest shade in the gradient as the base. Next, I went in with my sponging and did three passes of sponging on each nail to get to the opacity and blend that I was looking for.
I decided to go in with an iridescent flakie topper over my gradient base as well, both to just further smooth out that blend and also to add a little bit of texture and twinkle to the base. The Sally Hansen Glazed Top Coat actually worked quite well with these base colors and in the end added just a subtle hint of what could be a slightly artist leaning impression of stars.
Next, for the stamping, I used 3 images from the Uberchic Halloween 05 stamping plate. I decided to add a bit more oomph to the stamping by applying the image first in white and then slightly offset in black to really pop the silhouette. For my ring finger, I applied the spooky tree and grim reaper silhoutte images. For the middle, I applied the haunted house image as well as three small bats. And finally, for the outer nails I applied the full cover bats image, which I think works pretty well with the other two images even though it technically isn't a landscape sort of image.
Once I was happy with my design, I sealed everything in with a nail art top coat and finished with a generous layer of glossy top coat for shine and volume. And voila!
All Products Used:
Color Club - Yellin Yellow
Color Club - Catch A Fire
Color Club - Beach Please
Color Club - Pucci-licious
Color Club - Seas The Day
Color Club - We Liming
Sally Hansen - Glazed Top Coat
Whats Up Nails - Blanc My Mind*
Whats Up Nails - Neither Noir*
Apipila Smudge Free Top Coat
Whats Up Nails Gloss Over Top Coat*
Uberchic Beauty Halloween 05 Stamping Plate
Whats Up Nails Magnified Clear Stamper & Scraper*
Pueen Latex Tape Liquid Peel Off Cuticle Guard*
* = PR Sample
I'm honestly just so happy about how this mani turned out and I'm so glad that I decided to do the vertical neon gradient as the base for this mani. I feel like it works as a background even though it is distinctly not a night sky sort of vibe. For me, this definitely ends up feeling a little bit psychadelic - which I love for Halloween!
Be sure to head over to my Instagram @pblnails for video tutorials for this and every mani I post here on the blog and follow me there - or check back here - for Halloween nail art designs every weekday in October!
Thanks for reading!


0 comments