
#HalloweenNails202312 Nails Of HalloweenColor ClubHalloweenHalloween NailsKBShimmerKokieManitudenail artnailsWhats Up Nails
HALLOWEEN NAIL ART: Smooshy Pink Spooky Love Nails

As I was looking through my stamping plates to come up with Halloween nail art ideas, I found myself particularly drawn to the Manitude x Pretty Creepy Stamping Plate. There's just something particularly enjoyable about the images on this plate and I feel like the possibilities for what you could create with it are sort of endless. I think, in the end, the inspiration for this came from the little bows with skulls at the center - it felt sort of playful, like a teenage goth romance, so that's the direction I took it in. Leaning into my early to mid 2000s emo girl hard.
Keep reading for more!
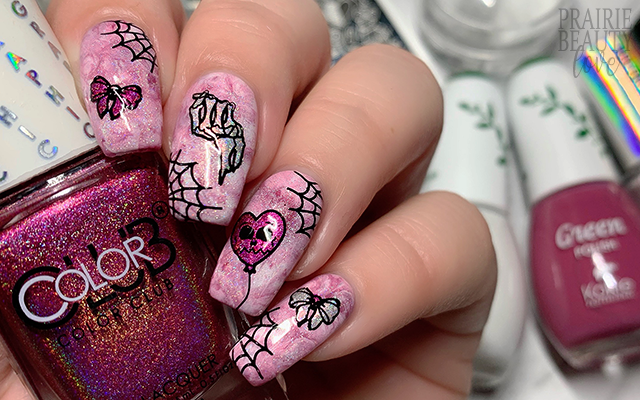
Because I wanted to lean into the cuteness of it all, I decided to do a pink smoosh base. I love a smoos, I really do, and I feel like it's a great technique for Halloween nails because it can almost feel like a grungy texture if you do it right. I started by applying one coat of the middle shade in my smoosh, a pale pink shade, and let that dry along with a latex cuticle barrier to aid in clean up. Next, I applied dots of the pale pink along with white and a deeper berry pink to the head of a stamper and then pounced that on the nails until I got the desired blend on the smoosh.
I like to go in with my cleanup brush right then and there are well and remove any excess polish pooling around the cuticles just to ensure a clean edge when I remove the latex barrier.

For each nail, I picked up a main image to be reverse stamped. Because I was leaning into the spooky love vibe, I picked up the skeleton Korean finger heart, the heart shaped skull balloon, and the bow with the skull in the center of it (three times). I alternated between a dotting tool and a nail art brush to fill in the images using two different linear holo polishes from Color Club. Once those had dried down on the stamper heads, I applied one coat of a linear holo top coat over my base just to add a little bit of twinkle as well as to act as a tacky layer to grab the images. First, I applied a small spiderweb image at the corner of each nail and then I went in with my decals, applying each one at a slight angle in relation to the placement of the spiderwebs.
Once I was happy with my design and everything was cleaned up, I sealed in my design with a nail art top coat and followed with a generous layer of glossy top coat. And voila!

All Products Used
Kokie Green - Cherry Blossom*
Kokie Green - Moonbeam*
Kokie Green - Call Me*
Color Club - That's Rich
Color Club - What's Your Sign?
Whats Up Nails - Neither Noir*
KBShimmer - Prism Break
Apipila Smudge Free Top Coat
Vibrant Scents Fast & Hard Top Coat
Manitude x Pretty Creepy Stamping Plate
Whats Up Nails Magnified Clear Stamper & Scraper*
Pueen Latex Tape Liquid Peel Off Cuticle Guard*
NailStuff.ca Dotting Tool*
NailStuff.ca 4mm Nail Art Brush*
* = PR Sample

I have to say, I feel pretty good at having accomplished what I set out to do. This feels very baby goth to me, like the combination of pink and black that screamed Hot Topic back in the day. And a bit of a different take on Halloween nails, I think, not entirely on the nose. Love them!
Be sure to head over to Cosmetic Proof and See The World In PINK for more Halloween themed nails for this weeks #CBBxManiMonday. And check out my Instagram @pblnails for video tutorials for this and every mani I post here on the blog and follow me there - or check back here - for Halloween nail art designs every weekday in October!
Thanks for reading!


0 comments