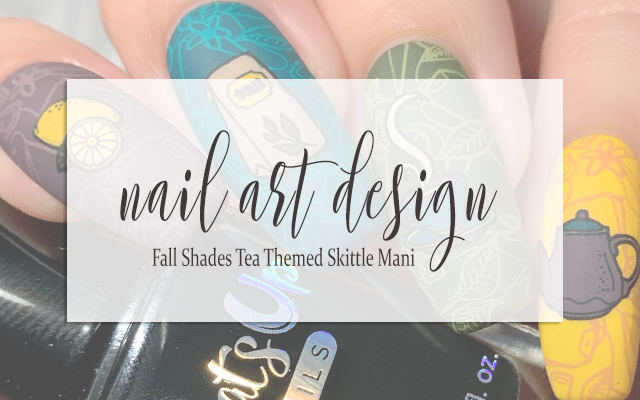
Very much like the Coffee & Donuts themed mani I posted earlier this week, I knew when I picked up the Manitude x Sip It Stamping Plate that I was going to be doing some version of this mani this fall. There's just something about the warm coziness of a nice cup of tea during the fall months, but also I felt like this was a great opportunity to create a really beautiful, saturated color story to bring together the tea theme - perfect for fall!
Keep reading for more!
When I sat down to do this mani, I already had a lot of it planned out in my head. I knew which images I was going to use and which nail they were going to be placed on and had a general idea of the design I wanted to create - it was just a matter of choosing a color story that would suit it. In the end, it all came together when I decided that I wanted one of the nails in my skittle to be a rich, bold teal and ended up settling on this one from Revlon. In the end, I decided to grab for a few shades from this particular range to fill out the skittle and then ultimately decided that I was going to also use them as my fill colors, with a couple of assists where I needed something a little different.
I started by applying all of my my base polishes, two coats of each, to my nails in rainbow order starting with yellow at my pinkie. These polishes really do have a gorgeous formula and I may have been able to get away with a singl coat, but I really wanted to make sure I had a densely saturated base polish to build the rest of the mani on.
Next, using a couple of different stampers, I picked up the images I was planning to use and filled them using a combination of dotting tools and nail art brushes to try and get a really crisp fill to each image. I was mindful of which image was going on which nail while I was filling them and did try to ensure that I was going to get good balance to the overall design. Once all of my decals were filled and just dry enough to transfer without destroying the image, I applied a layer of sticky base coat, working on one nail at a time. Once the base coat had dried down until it was tacky, I went in with the full cover tea bags image from the plate in a slightly different version of the base color (lighter on all of the nails except my pinkie.) Next, I transferred the decal from the stamper straight onto the nail, trying my best to keep the images centered on my nail. I repeated this exact same process for each of my nails and it went quite smoothly.
Once I was happy with the design, I crisped up my edges with a clean up brush dipped in acetone and then sealed everything in with a nail art top coat. Finally, I finished with a matte top coat to bring down the shine and just bring everything together. And voila!
All Products Used
Revlon - Marigold Maven
Revlon - Commander In Chief
Revlon - Daredevil
Revlon - Grounded
OPI - Coconuts Over OPI
OPI - Alpine Snow
KADS - 033 Khaki
KADS - 048 Light Matcha Green
KADS - 028 Lake Blue
KADS - 043 Lavender
Whats Up Nails - Neither Noir
Apipila Smudge Free Top Coat
Glisten & Glow Glitter Grabber
OPI Matte Top Coat
Orly Bonder Base Coat
Manitude x Sip It Stamping Plate
Whats Up Nails Magnified Clear Stamper
Pueen Clear Stamper
NailStuff.ca Nail Art Brush**
Pueen Latex Tape Liquid Peel Off Cuticle Guard
** = PR Sample, Affiliate NailStuff.ca
Man, that list of products that I used to create this mani is long AF, but I definitely don't feel like any of it was wasted. I really feel like having that full cover image in the background, especially in a subtle, low contrast color, helps to fill the nail and adjust the scale so that the smaller images don't feel stark in the overall design. If that makes sense. Does it make sense? Ironically, as I write this I could definitely use a bit more coffee to perk me up!
Are you following me over on Instagram @pblnails yet? Be sure to head over there for the occasional Instagram only bonus mani as well as video tutorials for all of my nail designs!
Thanks for reading!


0 comments