
NAIL ART: Warm Abstract Moths & Foliage Fall Nails
A few months ago, now, I was filling up my cart over at Harlow & Co and got a very, very random urge to try out some water decals. I've used water decals a few times in the past and I think they're a really great way to easily and quickly create some intricate nail art designs, but personally they just aren't something I reach for using all that often so this was a little random but I went with it. I decided to pick up the sheet I used for this mani because I just loved the colors and overall vibe of the really distinctly fall leaning designs on it and now the time has finally arrived to use it!
Keep reading for more!
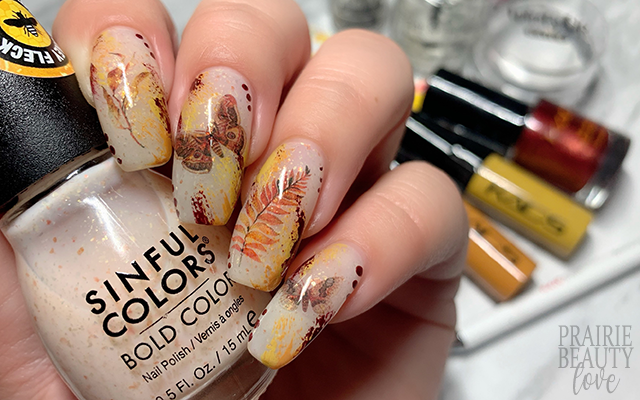
So I feel like it's fairly obvious that the overall design for this mani really was dictated by the color story in the water decals. I actually started out by choosing which images I wanted to use and I settled on a vibe of Moths & Foliage because it felt like it would end up being really cohesive. I chose and cute out my images, using larger images for my middle nails and then smaller, more delicate ones for the outer nails.
Because water decals are necessarily not opaque, you really do have to use a base that's going to pop them somewhat, so I knew I had to go with something light. In the end, I grabbed for Honey Child from Sinful Colors, which is an off white crelly with gold and copper flakes through it. I feel like that off white tone along with the colors of the flakes really worked perfectly with these decals and managed to balance popping the decals without feeling stark the way a white créme base would have. From there, I chose three stamping polishes to do my dry brushing with. I went with a mustard yellow, a muted turmeric sort of orange, and a quite deep metallic burnt red.

To start, I applied two coats of Honey Child to all of my nails for my base. This polish is quite sheer, so even with two coats this still quite a see through, which is definitely the look I was going for. Next, I went in with my dry brushing in a technique that's sort of become quite common for me. Essentially, I just do some light dry brushing from opposing corners of the nail towards the center. I started with the orange, then the yellow, and finally the burnt red.
Next, it was time to do the water decals. This is actually a seriously easy step. First, cut out your water decals as close to the actual image as you're able. Next, using a pair of tweezers, dip the decal into some water for a couple of seconds and then pull it out. I like to use a stamper to apply my water decals, so I lay the decal face down on the stamper head and let it sit for about 10-15 seconds before I remove the paper backing and dab away any excess water. Finally, just transfer to the nail using the stamper and place where you'd like it.
To finish, I sealed everything in with a nail art top coat and then followed with two coats of glossy top coat. I had a little bit of texture because I didn't trim the decals enough, but was easily able to smooth it out with top coat. And voila!

All Products Used
Sinful Colors - Honey Child
KADS - 040 Ginger
KADS - 033 Khaki
KADS - Z09 Pearly Wine Red
Apipila Smudge Free Top Coat
Vibrant Vinyls Fast & Hard Top Coat
MILV N1415 Water Decals
Whats Up Nails Magnified Clear Stamper
NailStuff.ca Dotting Tool**
** = PR Sample/Affiliate. Use code TRYSH for 10% off first order at NailStuff.ca

I have to say, I'm really glad that I decided to pick up these water decals to try out because they really do create a totally different look from my usual nail art style. There really is just no way to recreate this level of detail with stamping and there is just no way I get anywhere close to the skill that would be required to recreate this design. I also love that I was able to use them in a way that still feels true to my personal style, because obviously that's really important as well.
Be sure to head over to Cosmetic Proof and See The World In PINK for our last Fall themed #CBBxManiMonday before it's officially time for Halloween nails! Also, if you're not following me over at @pblnails on Instagram, be sure to drop a follow to keep up on all of my nail art and check out video tutorials for all of my work!
Thanks for reading!


0 comments