#ChristmasNails2022#NailArt12 Nails Of ChristmaschristmasChristmas Nail Artnail artnailsWhats Up Nails
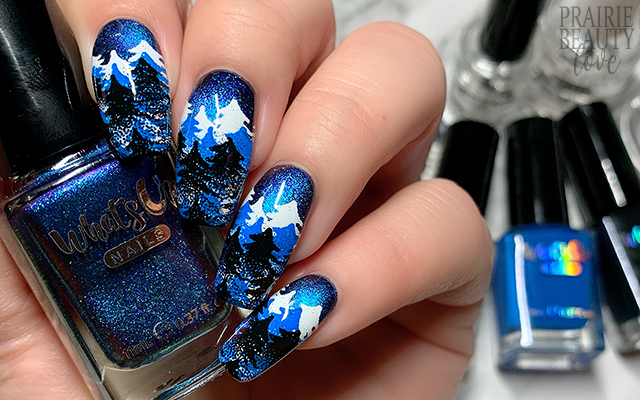
CHRISTMAS NAIL ART: Frosty Layered Winter Forest Nails
When it comes to my holiday nail art posting schedule, I do like to throw in some less Christmas specific nails and go in the direction of just being wintery. That can obviously come in the form of snowflakes, which get a lot of love from me at this time of year, but it can also come in the form of a fun holiday landscape. Last year I did a green layered forest design that was actually inspired by some holiday packaging, so this year I wanted to change it up a little and go with a different color palette, stamping plate, and I think just overall vibe. It's interesting, I think, how two things that are really similar can actually also be entirely different.
Keep reading for more!
So really the whole color story for this mani was built off wanting to use Whats Up Nails' Night Contrails as the base. Now, I am generally not a fan of magnetic polishes, but after trying out this one I really, really have to rethink that. This polish is a blue base with with a teal to purple cat eye effect and blue iridescent duochrome shimmer and if there has ever been a polish that more effectively bring the vibe of an aurora borealis - or the northern lights, for the uninitiated - I have certainly never seen it. It's absolute perfection and I knew that it would serve perfectly as a base for this layered forest design.
So, to start, I applied two coats of Night Contrails to all of my nails, making sure to position my magnet to ensure that there would be a strong flash that would come out from behind the trees.
The stamping for this design is actually really, really simple to do because it's a full cover image. One issue I find with layered landscapes is that they cut off in a way that actually makes it really awkward to stamp, but this full cover image from the Whats Up Nails B049 Hot Chocolate Season Stamping works perfectly because you just have to shift it down a couple of millimeters and maybe shift it a little bit to the side and that's it - no worries about bare spots behind your next layer. To mimic a sort of hazy forest, I started by stamping the image in white, then a really classic blue, and finally in black.
Once I was happy with the design, I sealed everything in with a nail art top coat and then followed with a generous layer of quick dry glossy top coat for shine and volume. And voila!
All Products Used
Whats Up Nails - Night Contrails*
Whats Up Nails - Blanc My Mind
Whats Up Nails - Jay For A Day
Whats Up Nails - Neither Noir
Apipila Smudge Free Top Coat
Sweet & Sour Lacquer Gloss Sauce Top Coat
Whats Up Nails B049 Hot Chocolate Season Stamping Plate
Whats Up Nails Magnified Clear Stamper & Scraper
Pueen Latex Tape Liquid Peel Off Cuticle Guard
* = PR Sample
Seriously if you're like me and magnetic polishes have never really done it for you, I highly recommend giving this one a chance because it's just absolutely stunning. The cat eye effect is beautiful and gives a ton of dimension and it really, really does feel so much like an aurora borealis. Honestly, I feel like I can wiggle my fingers around and pretend it's the northern lights. (And yes, I have stood under my favorite light in my house for nail polishes like this and done exactly that because I am a kid at heart.)
If you're interested in seeing a tutorial for this design - or any of the other holiday designs I've put together, head over to @pblnails on Instagram and follow me there to keep up on all of my nail art designs!
Thanks for reading!


0 comments