
NAIL ART: Psychedelic Faux Watermarble Nails ft. Pueen Cosmetic
THIS POST IS IN PARTNERSHIP WITH PUEEN COSMETICS.
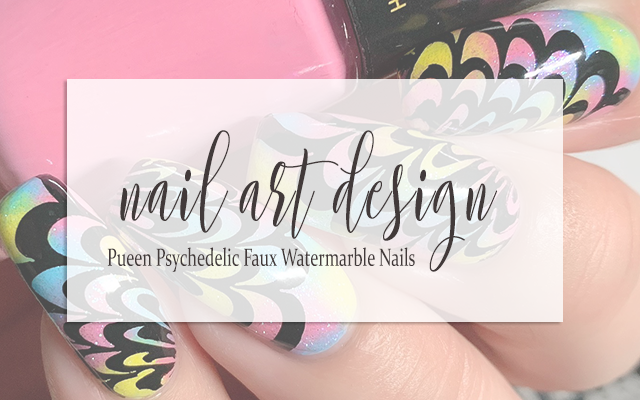
Like a lot of people who like to do nail art, the dreaded watermarble has been a technique that has eluded me in regards to actually getting good at it. It's worked out a few times, but there have been many times when I've tried and just thrown up my hands. Enter a water marble stamping plate! Now, I will admit that this isn't going to give you the same look as an actual watermarble, but I do think that the look it creates (especially with the right base) can really bring the same vibe to a mani. So for today's nail art design, I paired this sort of rainbow base with crisp black watermarble stamping and to say I'm obsessed would be an understatement!
Keep reading for more!
So essentially what I wanted to do with this mani was to create a really basic but impactful rainbow base that would have a sort of psychedelic feel that would work well with the stamping design. Ultimately, I decided to do a sponging technique with stamping polishes to get the look and in the end I was able to figure out how to get exactly what I was looking for, though there was some trial and error along the way.
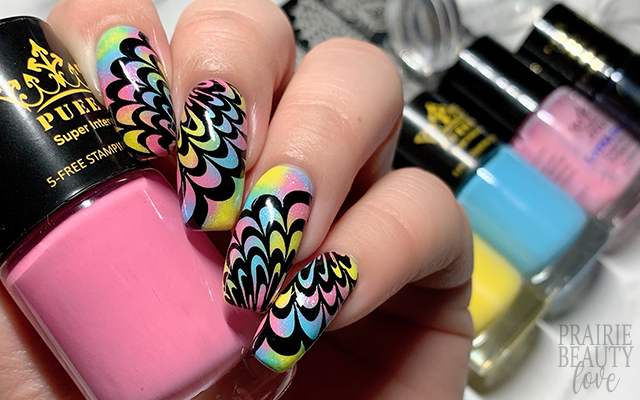
I started by applying my usual nearly-white créme polish to all of my nails as my base. I always do this when I'm going to be sponging because it gives a brightening effect and also gives the polish something to grab when I sponge it on. You could do this with a straight up white créme polish, but I find that a very pale pastel blue has very much the same effect and is just easier to work with than any white polish I've ever used, and it's also a little less stark if some of that base ends up showing up at the edges of the mani once you've cleaned up around your cuticles.

Next, on the flat side of a makeup sponge, I applied fairly large dots of light pink, baby blue, and yellow stamping polishes. I really didn't want the colors to get muddy on the nails, which is why I went with the larger dots. Next I sponged it onto the nails. This was definitely where the trial and error came in. The trick, I found, was twofold and did definitely hinge on using those super pigmented stamping polishes for this step. This really only worked when I only did one pass of sponging. I did try on two nails to do a second pass and it just muddied up the sponging and I had to start over. The second is to practice restraint. You do have to pounce, certainly, so that you get the colors to start to blend into each other, but you really don't want to move the sponge around too much or overblend at this point.
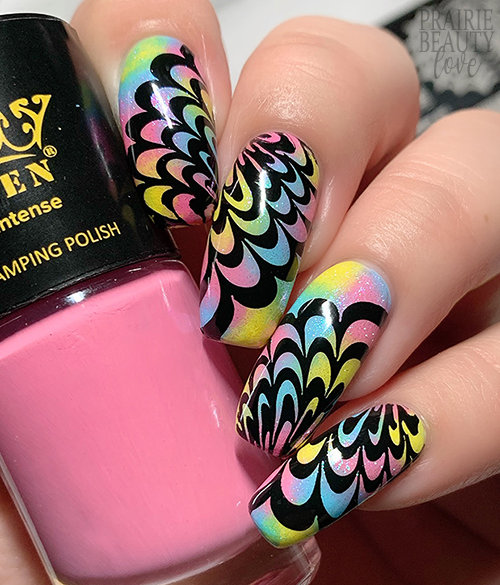
Once I was finished with my sponging, I applied a really fine particle iridescent shimmer top coat to all of my nails both to add a little bit of twinkle and also to give a smooth surface for my stamping. For the stamping I decided to go with a black polish because it just really felt like the right call in terms of contrast and that psychedelic vibe. I also went with an image that wasn't actually going to entirely fill the nails because I wanted that sort of creeping from the corners vibe as well. As usual, I also alternated the direction of the placement of the image to add some visual interest.
Finally, once I was happy with the design, I removed my cuticle barrier, removed any excess polish using a clean up brush dipped in acetone, and applied a nail art top coat to seal in the design. Finally, I finished with a generous layer of quick dry glossy top coat for volume and shine and voila!

All Products Used
Color Club - Astro-Naughty
Pueen Cosmetics - 808 Sweet Pink*
Pueen Cosmetics - 802 Baby Blue*
Pueen Cosmetics - 804 Bright Yellow*
Pueen Cosmetics - 805 Black Jack*
Dam - Magic Schmagic*
Apipila Smudge Free Top Coat
Sweet & Sour Lacquer Gloss Sauce Top Coat
Pueen Cosmetics Marble Paradise 01 Stamping Plate*
Pueen Cosmetics Clear Stamper*
Pueen Cosmetics Latex Tape Liquid Peel Off Cuticle Guard*
* = PR Sample.
As I said above, I am so completely obsessed with this mani that I really can't understate it. I don't love to toot my own horn, but... like, seriously, TOOT! I also think that now that I've figured out the best way to get this particular type of look when sponging on a base, you will likely see me break it out a little bit more often because I think it's a pretty versatile one.
If you're interested in checking out any of the Pueen products I used in this mani, they're all available from Amazon and I definitely think their prices are generally pretty affordable! Also, I wish they would just sell these three stamping polishes as a set because they are super versatile, not just for stamping but for creating beautiful rainbow backgrounds.
Thanks for reading!


0 comments