
#HalloweenNails202212 Nails Of HalloweenDimension NailsHalloweenHalloween Nailsheroine nycnail artnailsOPIWhats Up Nails
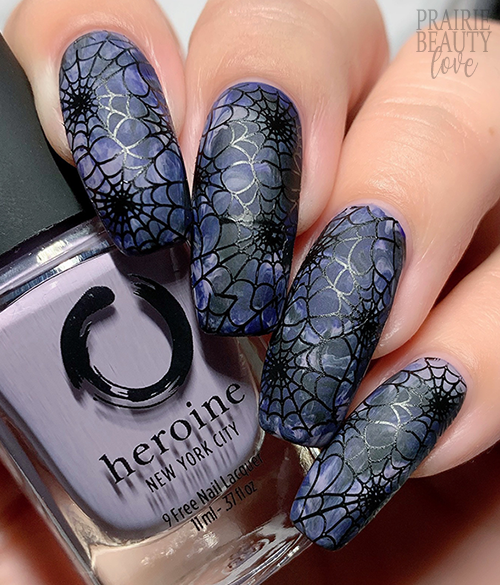
HALLOWEEN NAIL ART: Dark & Smoky Navy Spiderwebs Nails

So for today's Halloween mani, I did something a little bit different than what I normally do in an attempt to try to recreate a mani that was clearly done with gel polish - often a bit of a hit and miss endeavor, I must admit - but I think it turned out pretty cool. I'm a huge fan of @ashxmcgrath's work and I think her Halloween designs are some of her best, but I really wasn't sure how doing my own take on this gorgeous mani using traditional polish was going to go or if it would even work. Luckily, I think my take on it turned out pretty cool!
Keep reading for more!

I really, really wanted to maintain that really deep smokiness of the inspiration mani when I did this, but I knew I had to be careful not to go too dark or my black stamping wouldn't show up. Ultimately, I ended up going for a three color smoosh to create this look. Obviously I needed to go with a navy and black to reference the inspiration mani, but I also added in this really beautiful mauve taupe shade to bring some lightness to the smoosh while still maintaining that smokiness I was looking for.
I started by applying the lightest shade to all of my nails as my base and letting that dry down. Next, on the head of my stamper I applied dots of each of my colors. I tried to be pretty balanced with the navy and taupe and then I added black dots very, very sparingly as well. I found that to get the blend and marble that I was looking for with this mani, I did end up pouncing a little bit more than I might normally, but the blend did come out really smooth in the end.

Now for the tricky part. I knew that I needed to maintain that hint of shine with the stamping polish in order for it to pop at all on that really dark background, so I ended up top coating my smoosh base at this point with a matte top coat. I will say that I ended up with a little bit of smearing from the top coat (not at all uncommon with a matte top coat over nail art) so if I were to do this again I would probably apply a nail art top coat before my matte top coat just to prevent any of that.
Now, once the matte top coat was dried down, I went in with my stamping. I decided to use this full cover stamping image from the Whats Up Nails B054 Haul R Win Stamping Plate because it has the perfect thickness that I was looking for with the web lines. I alternated the direction of my placement just to break up the design a little, as usual, and just applied the image to all of my nails.
Now because, like I said, I needed to have that difference in finish for this design to pop, I just cleaned up my edges and voila - done!

All Products Used
Heroine NYC - London Fog
Heroine NYC - In The Deep
Dimension Nails - Black Rhino**
Whats Up Nails - Neither Noir
OPI Matte Top Coat
Whats Up Nails B054 Haul R Win Stamping Plate
Whats Up Nails Magnified Clear Stamper & Scraper
Pueen Latex Tape Liquid Peel Off Cuticle Guard
** = PR Sample/Affiliate ~ NailStuff.ca - use code TRYSH for 10% off your first order.
One thing that I will say is that if you want to recreate this, I would recommend going a little bit lighter on the base smoosh because as great as it looked immediately after I did this mani it did lose some of that oomph as my finger oils caused that matte finish to get a little bit flat. However, if you want to recreate this with gel polish I think it's a stunning design and I highly recommend.
If you're not already following me over @pblnails on Instagram, be sure to head over to check out video tutorials for this and all of the other nail art designs I post here on the blog and, of course, follow to stay up to date on my designs!
Thanks for reading!


0 comments