#HalloweenNails202112 Nails Of HalloweenHalloweenHalloween NailsKADSManiologynail artnailsSally Hansen
HALLOWEEN NAIL ART: Spooky Haunted Graveyard Nails
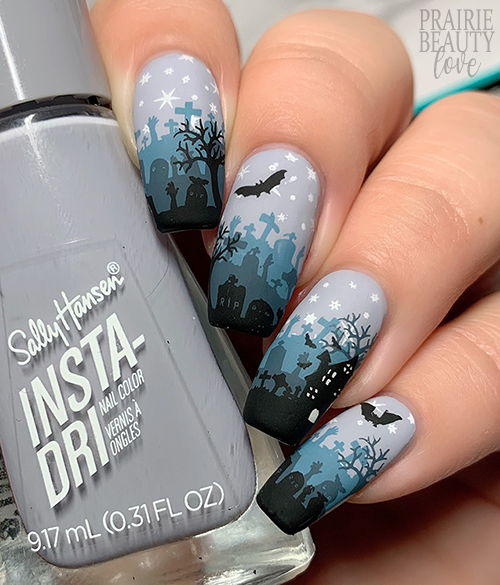
For a solid couple of years now, I've really wanted to do a sort of layered, hazy, foggy kind of graveyard design, but I always talked myself out of it. This year, I actually specifically got my hands on the stamping polishes that I knew I would need to create this design with it specifically in mind. I also knew as soon as I saw the Maniology M071 Stamping Plate that the graveyard silhouettes on that plate would be perfect for this design since they're so long and have good variation to make each layer different.
Keep reading for more!
I think the trick for getting this design to work is really, really in choosing the right colors to work together to create the vibe. I went with a really soft dove grey for the base, and used two varying depths of smoky blue with hints of teal in them along with a black and white to create the design. I think that if you don't choose that base color along with the blues specifically in the right tones, it wouldn't have that smooth feel that sort of tricks the eye into thinking that there's depth of field there.
For this mani, I started with two coats of Sally Hansen Insta-Dri in Show Steel-er (a drugstore staple for me) as my base and let them dry down entirely before moving on to my stamping.
For the layers of stamping in this design, I did stick entirely to the one plate (HUGE reason why I felt like this plate was perfect for this design) and I was conveniently able to go lightest to darkest with my application. I started with the white polish and the stars, focusing towards the base of the nail where I knew they would be visible. Next, I went in with the lighter blue and applied the first row of headstone silhouettes towards the center of the nail before going in with the same stamping polish underneath the stamping to give a little bit of of wiggle room for the next row. I followed with the darker blue and then the black respectively, choosing a different portion of the image on the plate for each row and including some trees and the sort of haunted house design as well. Finally, I added a couple of bats to the sky on two of my nails for a little bit more interest.
Once I was happy with the overall design, I sealed it in with a layer of nail art top coat and then finished with a matte top coat to take down the shine and, I think, add to the sort of foggy, spooky vibe. And voila!
All Products Used
Sally Hansen Insta-Dri - Show Steel-er
KADS - 45 Dark Grey Blue
Maniology - Bam White!
Maniology - Winter's Kiss
Maniology - Straight Up Black
Apipla Smudge Free Top Coat
Anchor & Heart Sea Glass Matte Top Coat
Pueen Latex Tape Liquid Peel Off Cuticle Guard
Maniology M071 Supernatural: The Spirit Speaks Stamping Plate
Whats Up Nails Magnified Clear Stamper
Honestly, I'm absolutely thrilled with how this design turned out and I'm so glad that I didn't quit in the middle. Admittedly, this turned out to be a fair bit of work and a bit more of a time commitment than I was expecting, but it was so worth it in the end and I know it's one that I'll remember the end result of more than the work that went into it. Also, sometimes those designs that are a lot of work end up looking sort of tortured, but I think this one stays sleek and almost easy going. (Yes, I am tooting my own horn...)
Be sure to check back every day in October for more Halloween themed nail designs and head over to @pblnails for video tutorials of all of my nail art!
Thanks for reading!


0 comments